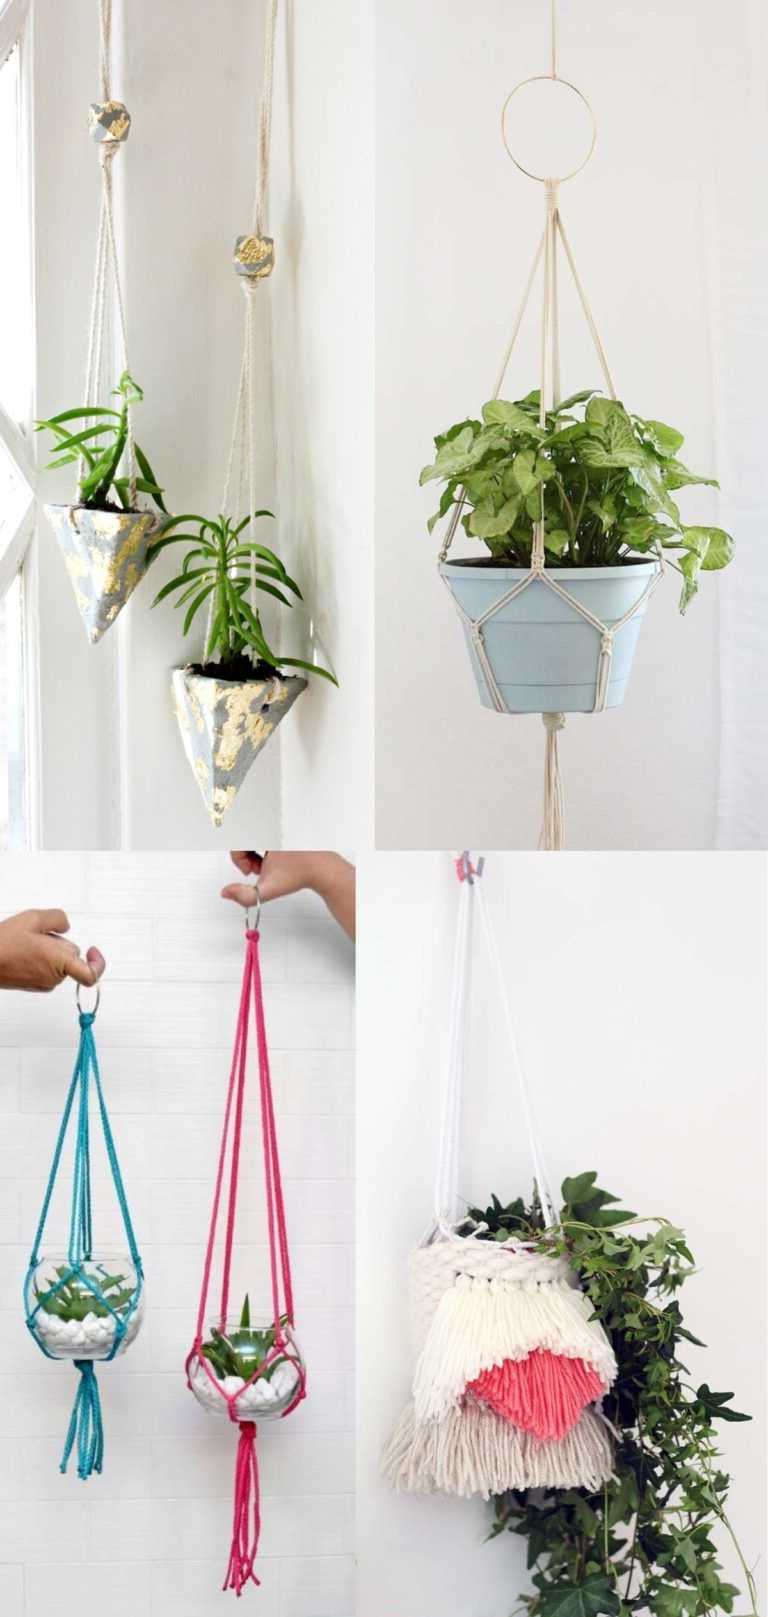
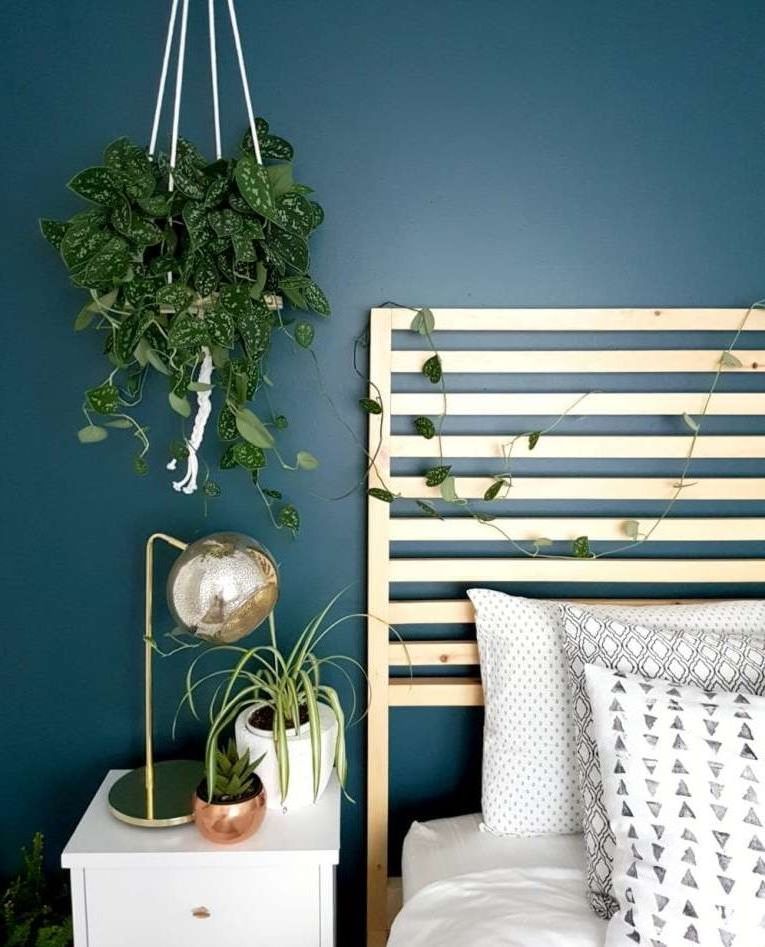
Learn how to make 6 different types of homemade hanging planters with full instructions and photos, perfect ideas for beginners. These easy projects are a fun way to add more greenery and life to your home. Indoor plants can be an easy and inexpensive way to instantly bring some color, texture and life to a space.
The vegetation definitely makes our house feel much more homey, full of life and color of nature.
Hanging glass and macramé planters
This macrame work is very simple to do. Try it with these glass planters that hang from colorful ropes embellished with easy knots. A perfect craft for beginners.
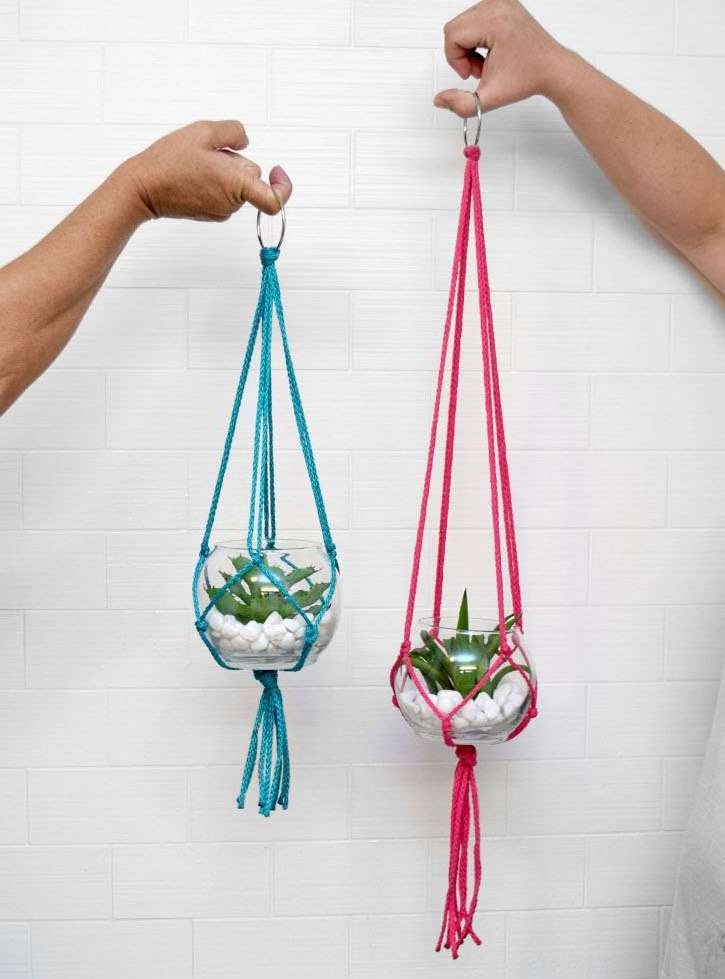
Although in this tutorial everything is arranged on a surface, it is recommended to work with the knots while hanging the entire project. You can place the steel ring on a doorknob and work from there. When it’s lying down things get very messy, but when it’s hanging the project looks so much clearer, you can turn it around and work very quickly.
For this project you will need:
- macrame cord
- metal rings
- Pair of scissors
- Lighter
- fake or real succulent plants
- glass pots
- Rocks or other filling
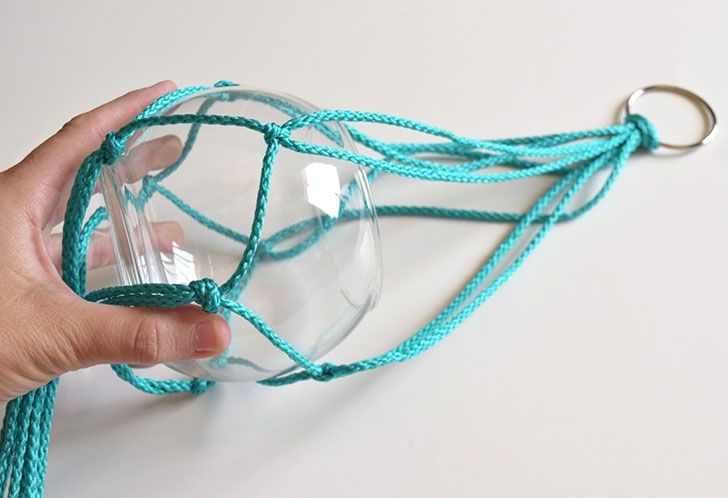
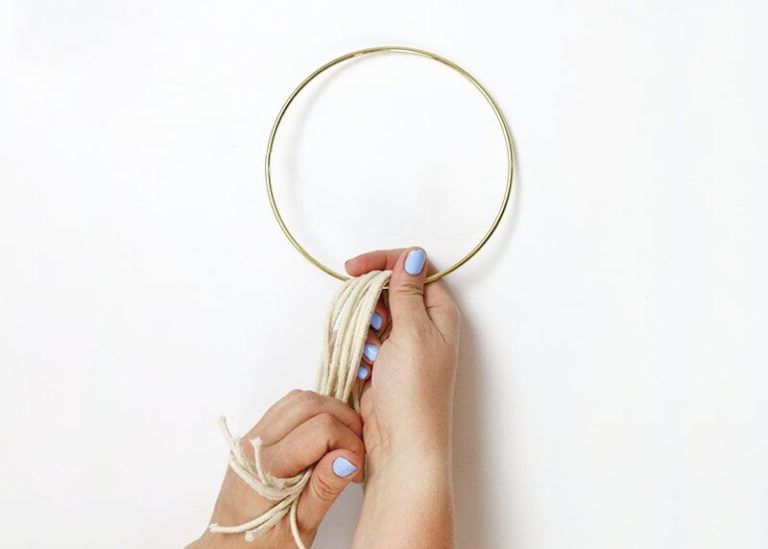
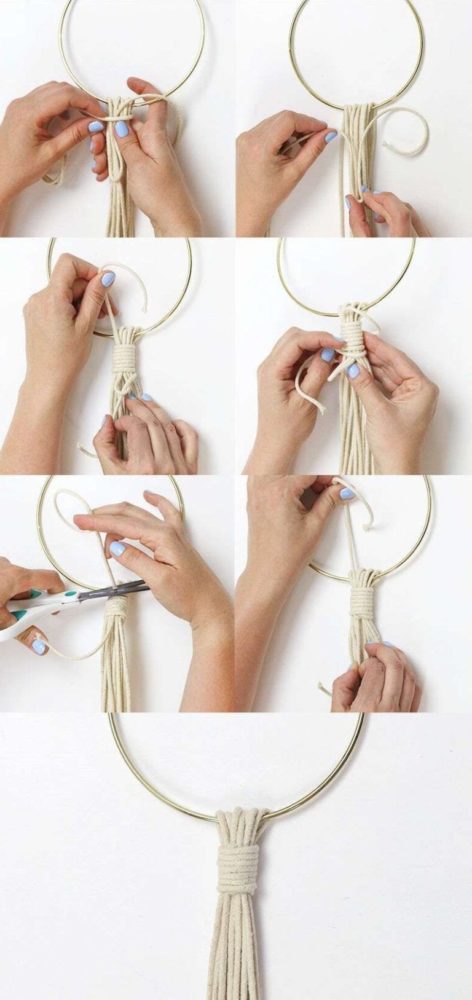
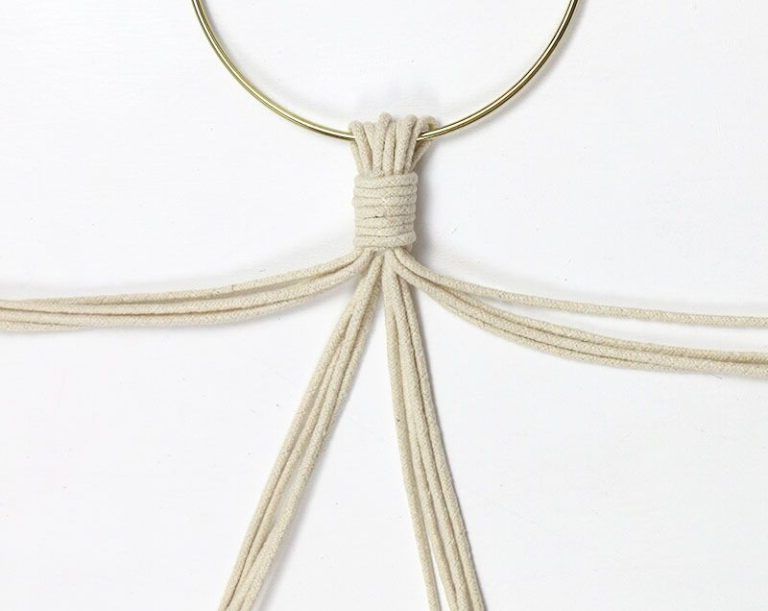
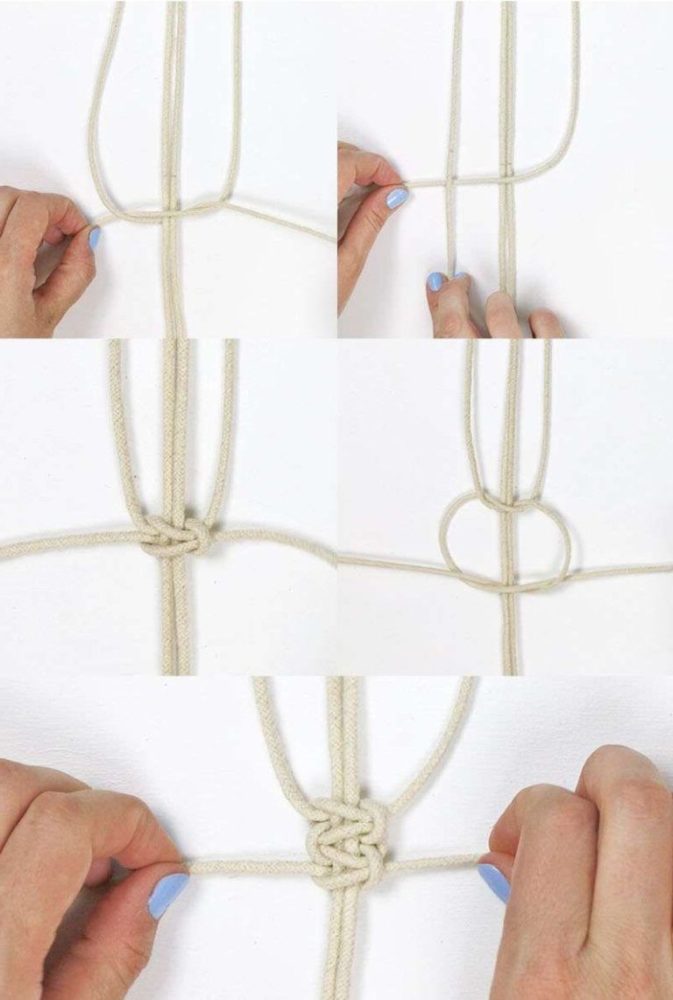
1) Cut four pieces of macramé cord that are approximately 1.5 meters long. Fold them in half and thread the laces through the center of a metal ring.
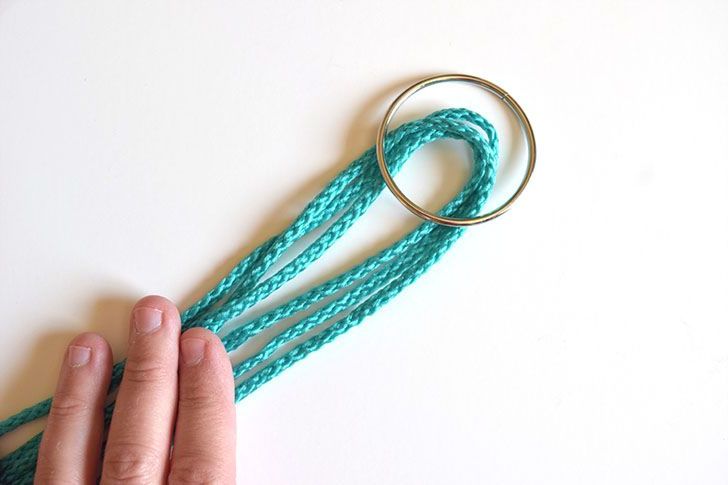
2) Thread the ends of the laces through the loop to create your first knot around the ring.
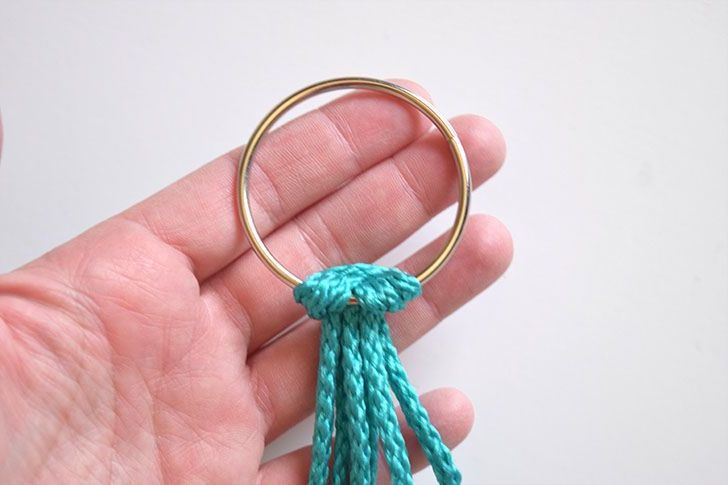
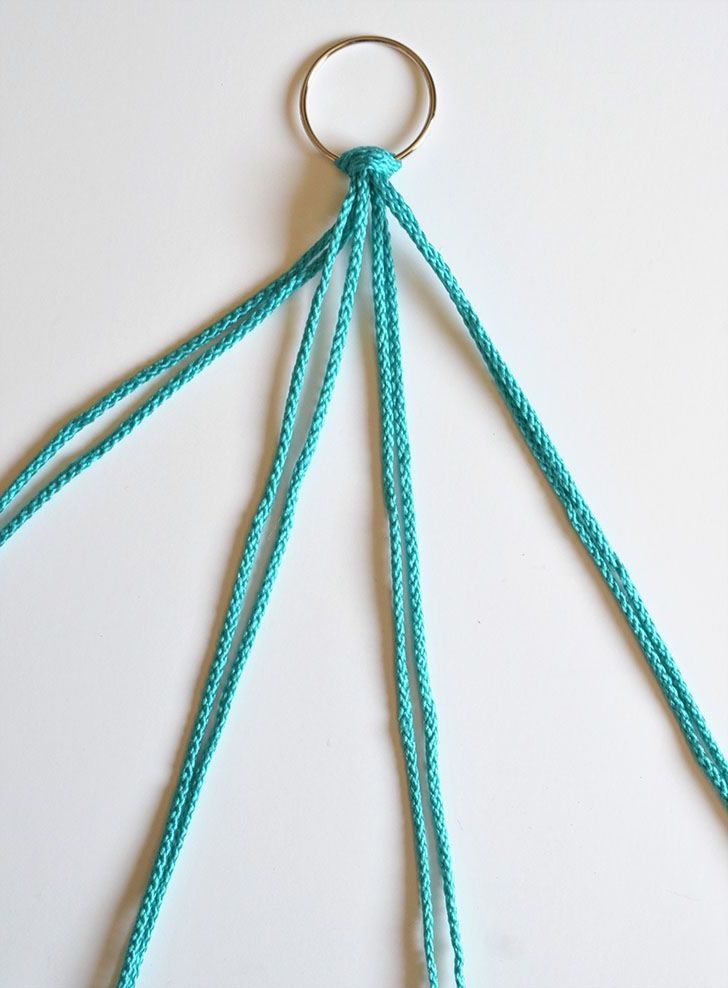
3) You will have 8 macrame cords hanging from the ring. Divide them into pairs.
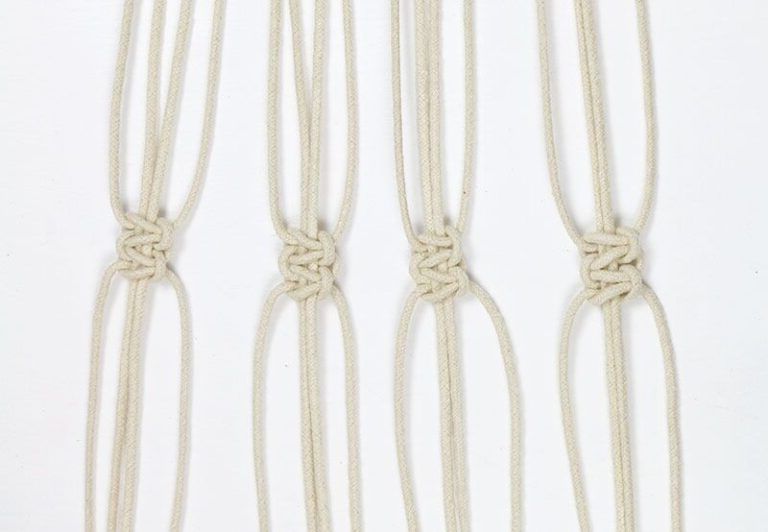
4) Starting roughly where you would like the top of the glass pot to be, form simple knots with two strings.

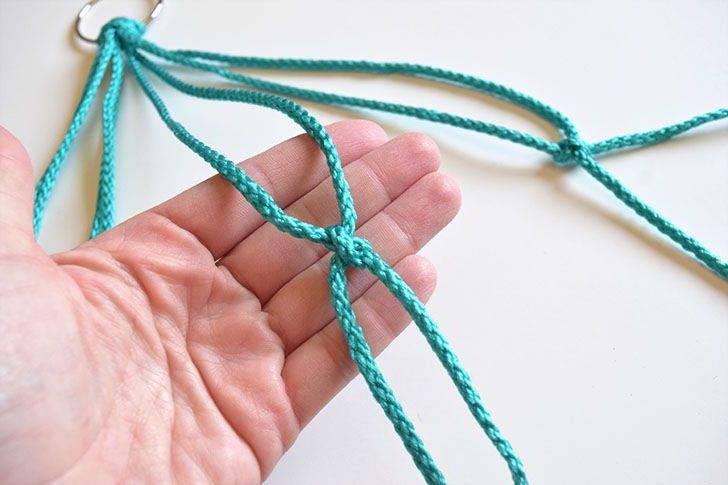
5) At the height of the middle of the pot, make knots again but joining two neighboring cords as we see in the image.
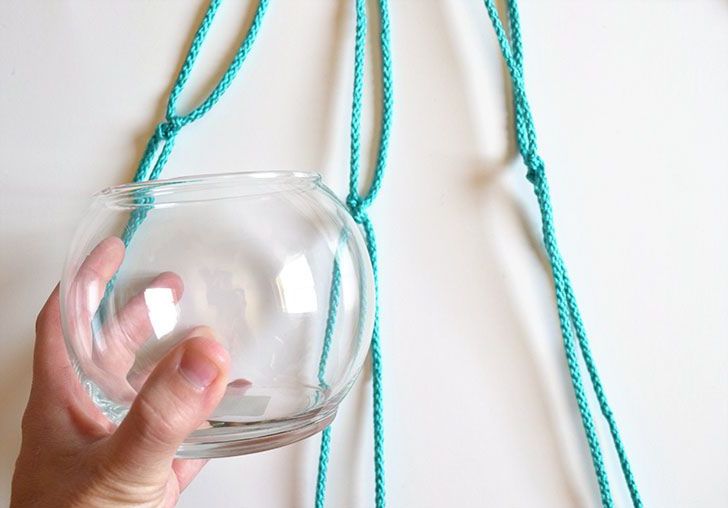
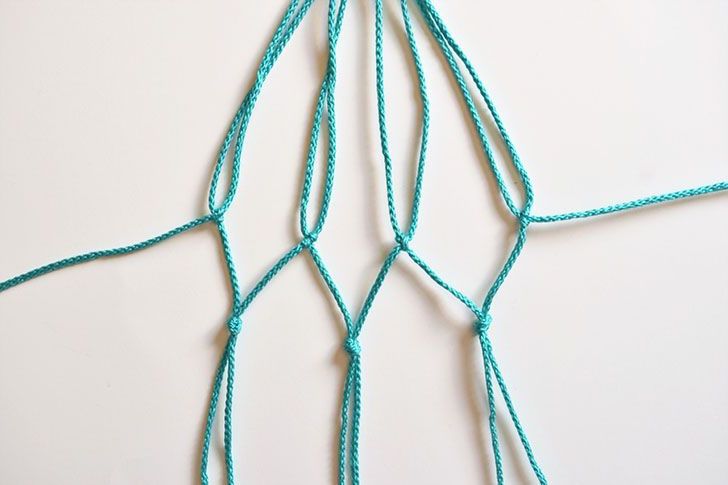
6) Finally, you should finish by making a knot with all the laces at the bottom.
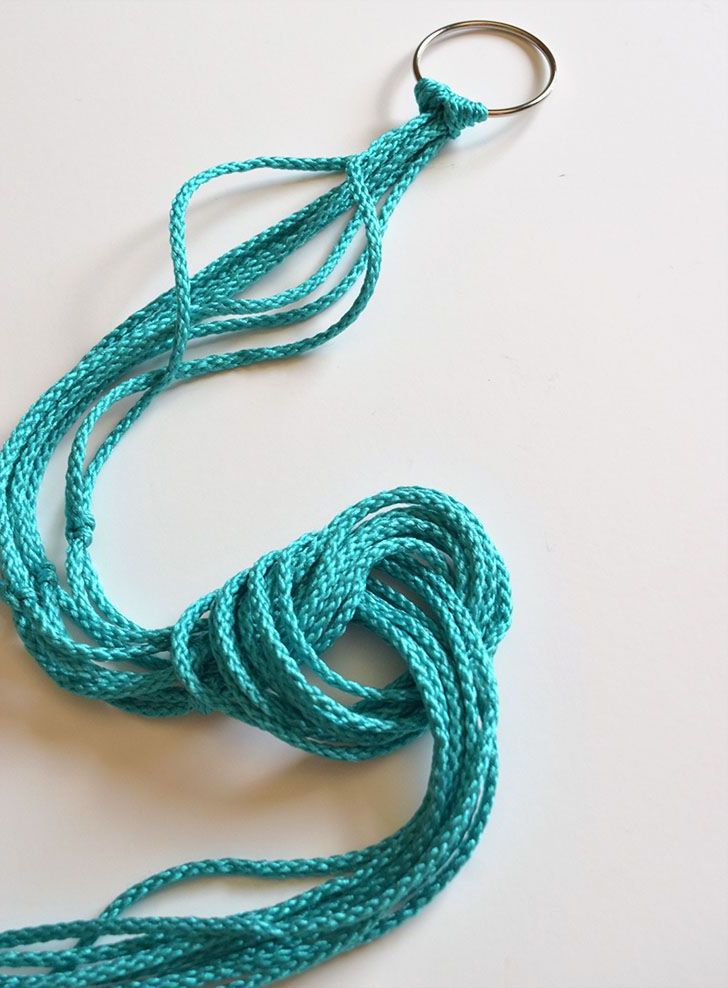
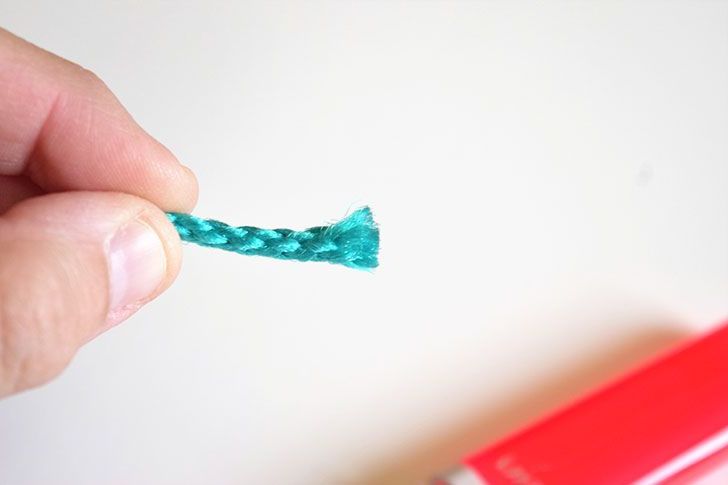
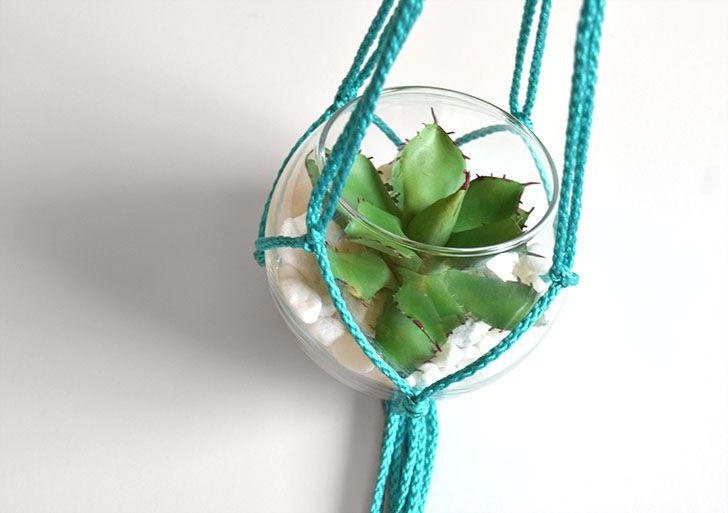
7) Trim the excess cord so that there is a nice decorative pendant on the end. Use the lighter to seal the ends to prevent fraying. Be careful because too much heat will cause it to burn and turn black. Plus, the cast plastic ends can stick to any surface they touch, even your skin.
8) Put in an empty pot to make sure it works well and fits smoothly.
9) Fill the pot with fake or real succulents and stones, soil, or any other fillers needed.
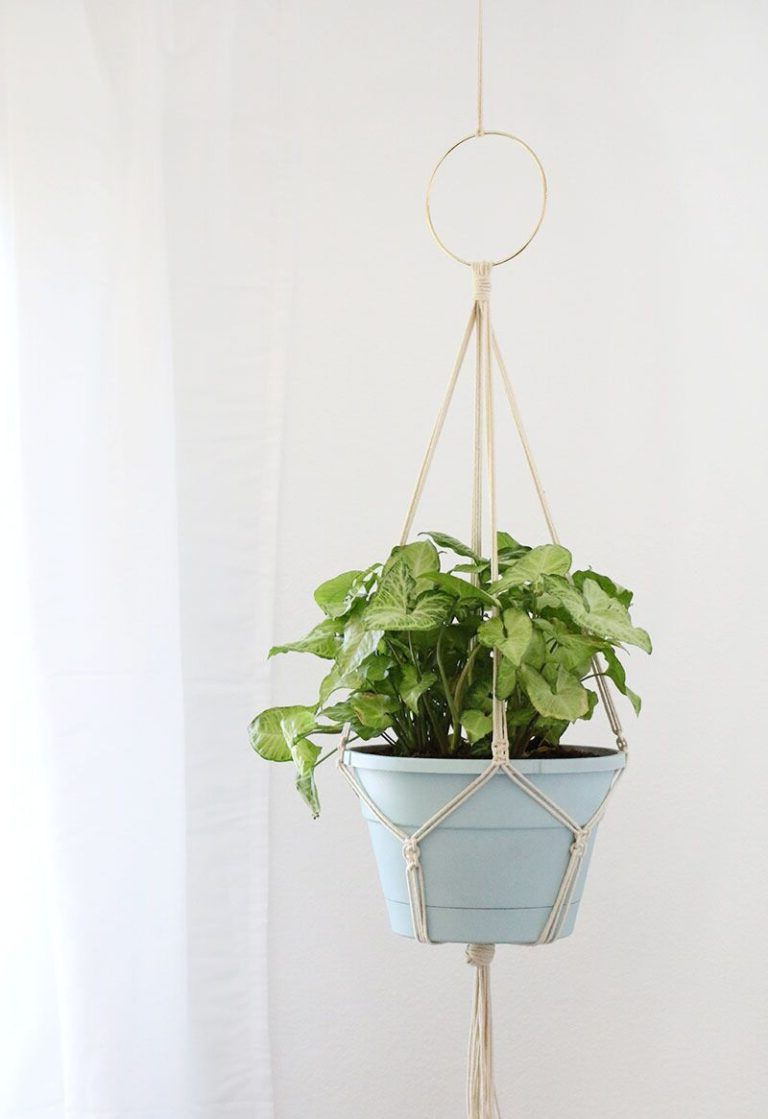
Simple macrame flower pot hanger
This is another easy project, using the typical macramé square knots, perfect for beginners.
 Items you will need:
 - 3mm natural cotton macrame cord
- Gold metal ring of the size you want
- Flowerpot
- Pair of scissors
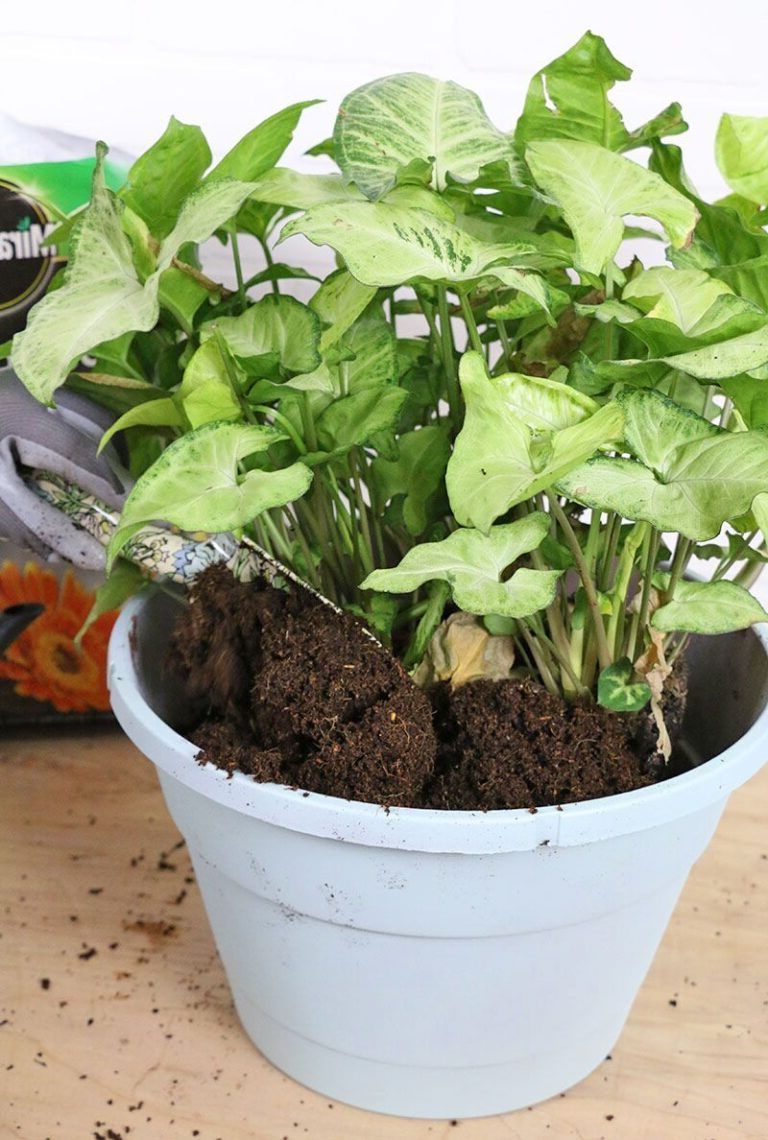
1) Start by placing your plant in its new pot. When the plant is happy in its new container, you can begin your macramé project.
2) Cut 8 long pieces of the macrame cord. For a large pot, each cord should be about 3 meters long. If you’re working with a smaller pot, they could be shorter. Once you have all 8 long strands, pull them through the hoop so they fold over at the midpoint. You will now have 16 long pieces of string hanging from the loop.
3) Next, we will secure them in place using the wrapped knot. This is a simple knot that has a very decorative look. You will need another piece of string for this knot, in this case a 60cm long string was used.
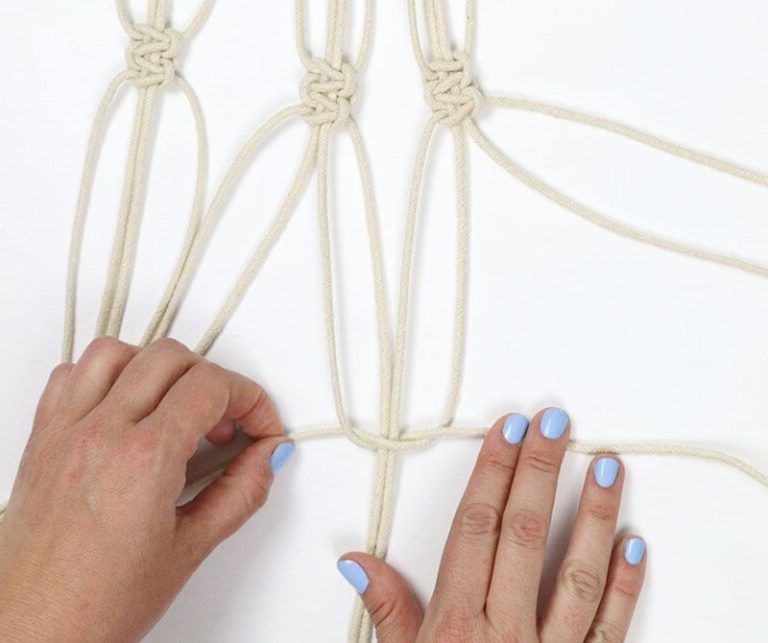
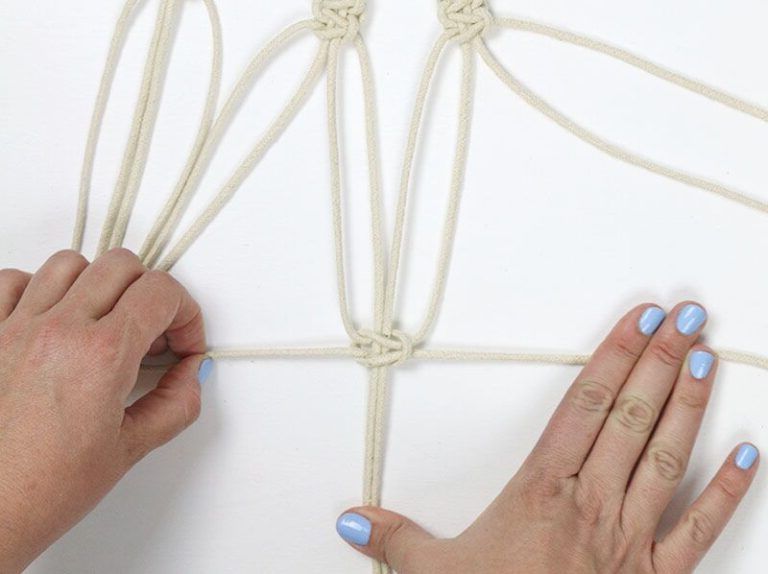
4) Next, we will make a row of square knots. Begin by dividing the 16 long strands into four groups of four strands each. We will form two square knots on each of these four groups.
5) To space them evenly around the pot, measure the same distance from the wrapped knot along each group of strings and mark with a pencil. For this hanger, 50 cm was measured for the first row of square knots. Each group of four strands should be separated into the two outer strands that will be used to tie the knots and the two center strands.
6) How to tie the macrame squar
e knot.
Follow these steps to create two square knots on each group of four strands.
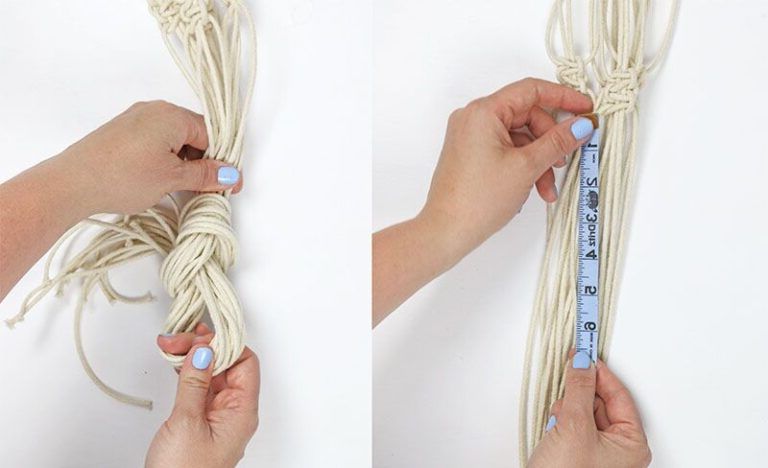
7) Next, we will make another row of square knots below our first row. These knots will be made on new groups of four threads. You will take two strings from each adjacent group. Measure how far below the previous row of knots you want these next knots to be. About five inches (12 cm) lower would work well in this pot.

8) To finish the plant hanger, you will need to tie all the cords in one final knot. Measure how far below the second row of knots you want the final knot to be. In this case it is about 20 cm lower. Coil all the laces and pull them to tighten and secure the knot. Cut the laces to even out the ends.
9) All that’s left to do is insert the pot and hang it up. Take care that the hook from which the pot hangs is well attached to the ceiling and is capable of supporting the weight of the plant.
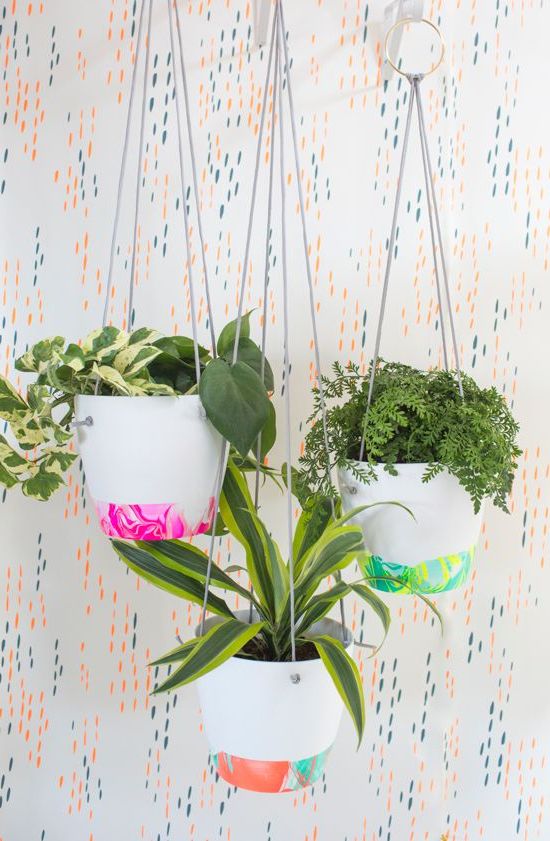
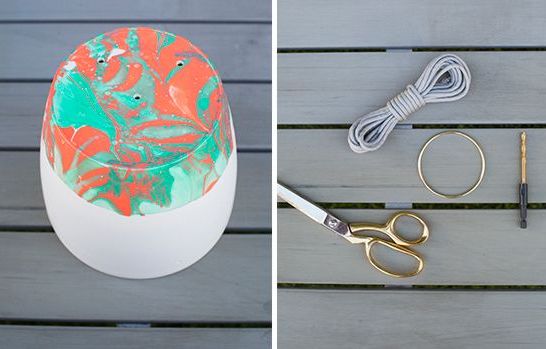
Marbled hanging flowerpot
To create a beautiful way to display plants, this proposal presents how to make marble effect pots.
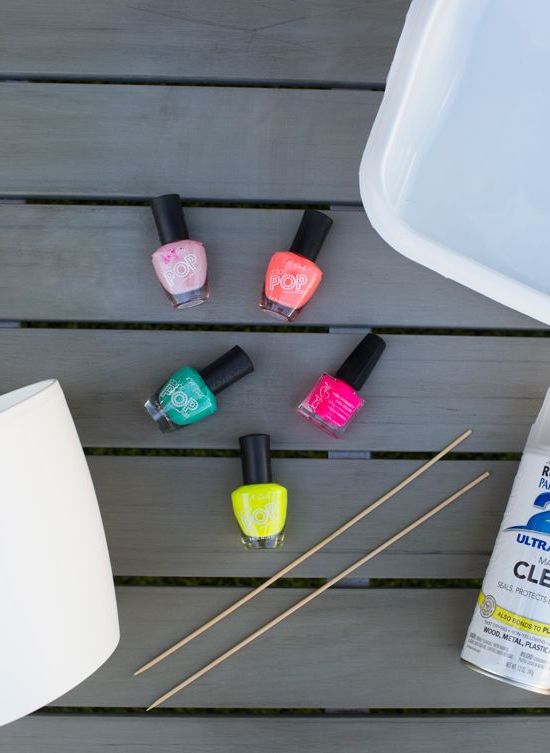
 For the marbling:
 - Nail polish (we alternate between 4 different colors – 2 per pot)
- Large, shallow disposable container, tub, or bucket
- room temperature water
- A stick such as a skewer or toothpick
- plastic pots
- Transparent matte finish
 To hang the pots:
 How to do the marbled effect
1) Fill the disposable container with room temperature water (you should use room temperature water to slow down the polish hardening process).
2) Gently pour the nail polish into the water, as close to the water as possible. If you pour it too high, the nail polish will sink to the bottom. The glaze should float. Place the desired colors.
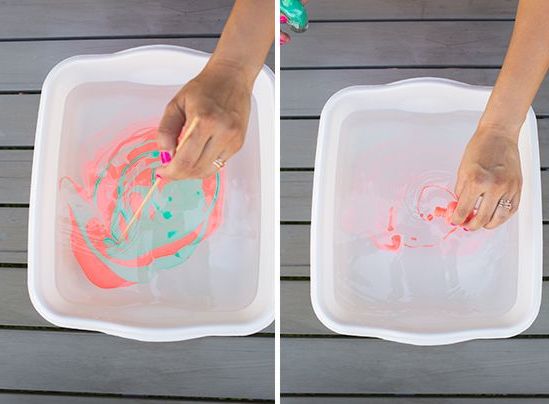
3) Use a stick to mix the colors to achieve a good design. Start in the center and work your way to the edges of the container. You’ll need to do this quickly so the polish doesn’t harden.
4) Soak the white plastic pot in water and then take it out. If there is white space or you want more marbling you can repeat the process. Let it dry for at least 30 minutes. You can use nail polish remover to remove it from sections you don’t like and start over if it messes up.

5) Once dry, spray with a clear matte finishing spray.
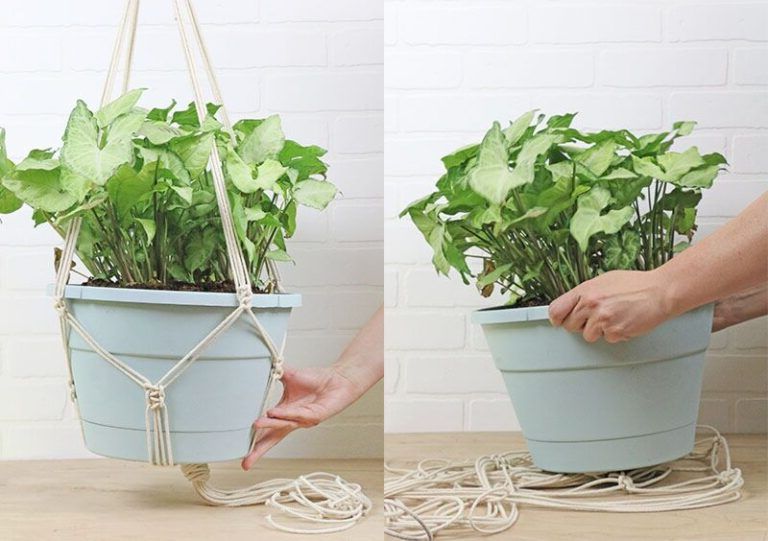
How to make the flower pot pendant
1) Drill several holes in the bottom for drainage.
2) Drill 4 holes near the top edge at the same distance from each other. They should be big enough for the cord to pass through.
3) Cut 2 cords of the same length. In this case they were cut from 1.20 meters.
4) Fold the laces in half and thread them through the metal ring.
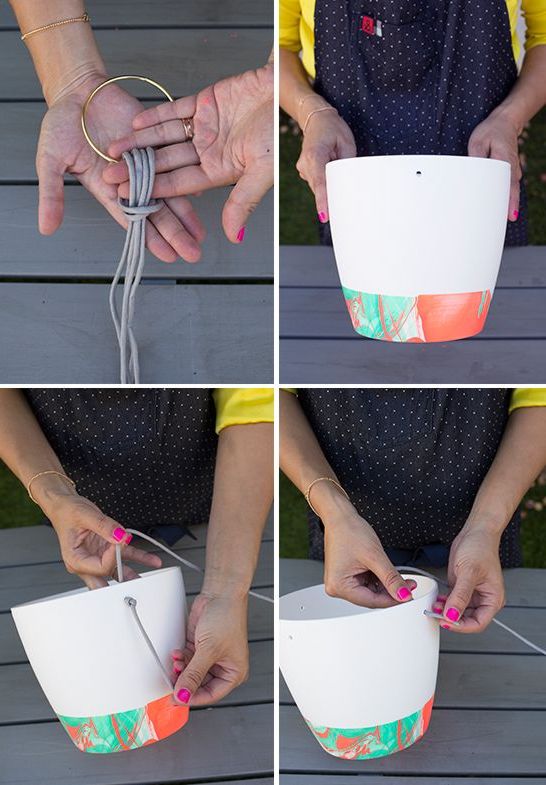
5) Thread each end of the strings (you will have 4 in total) through the holes in the pot and secure with a double knot.
6) Now it’s time to add your plants. Depending on whether you will keep them inside or outside, choose plants based on location as well as the amount of sunlight it will receive.
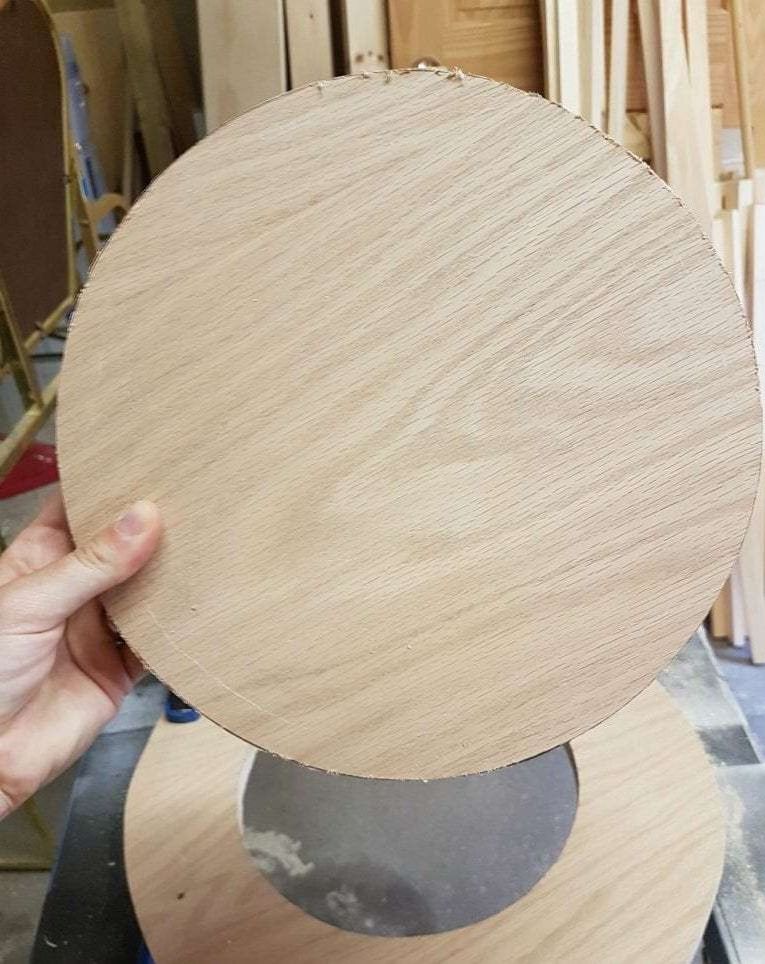
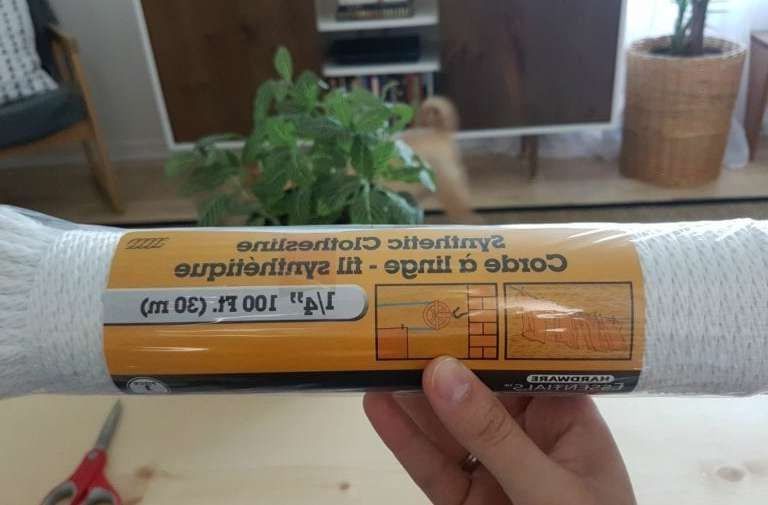
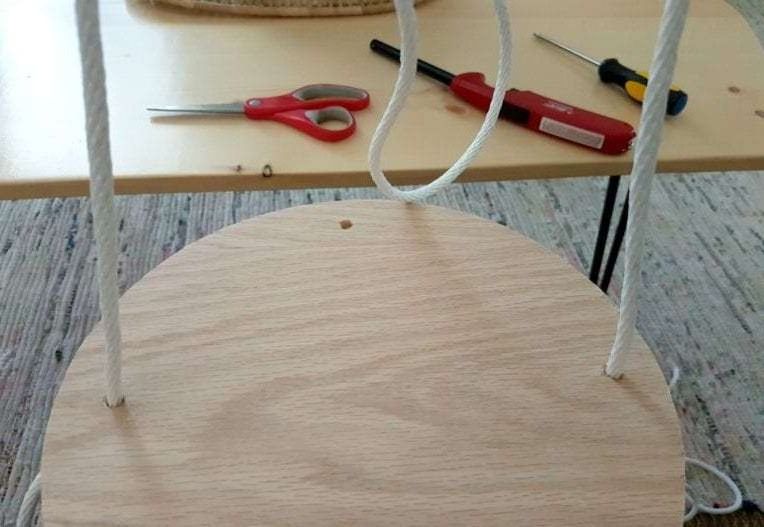
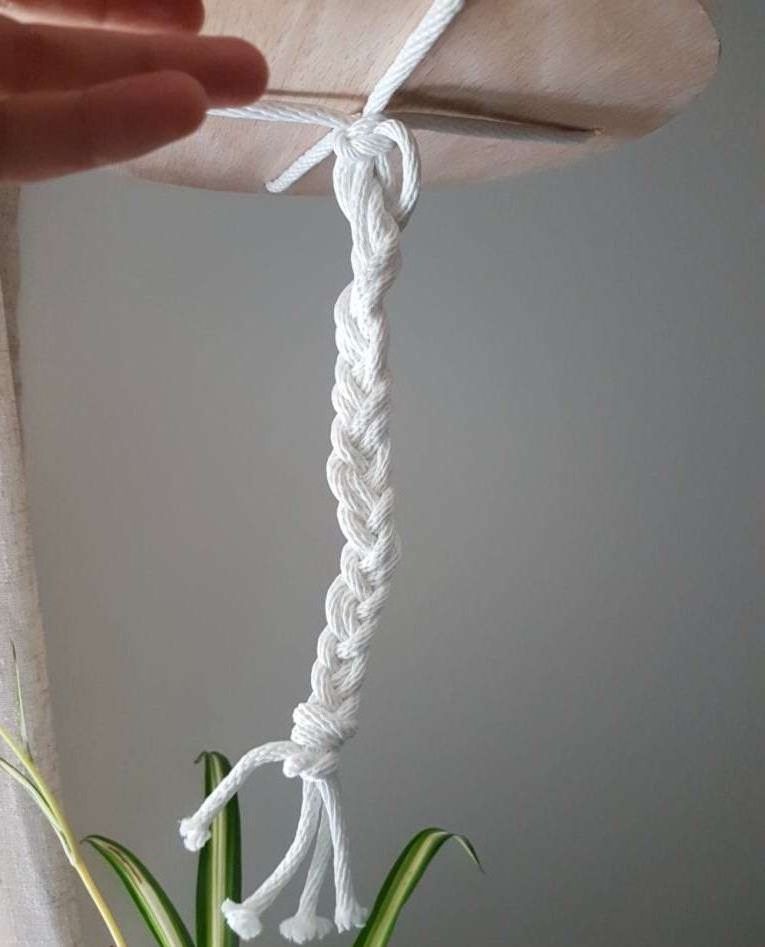
Hanging planter with wooden base
This cheap and easy hanging planter will take you less than an hour.
 These are the materials you need:
 - Wooden circle (this project uses a 30cm diameter one)
- String of the desired length, multiplied by 4
- drill and bit
- sharp scissors
- hanging hook
1) You can find wooden circles at any craft or home supply store. But if you have some leftover plywood, you can use it and cut it with a jigsaw.
2) Mark four points on the circle, approximately 2.5 cm from the edge, and drill four holes with an appropriate size drill bit, depending on the size of the string.
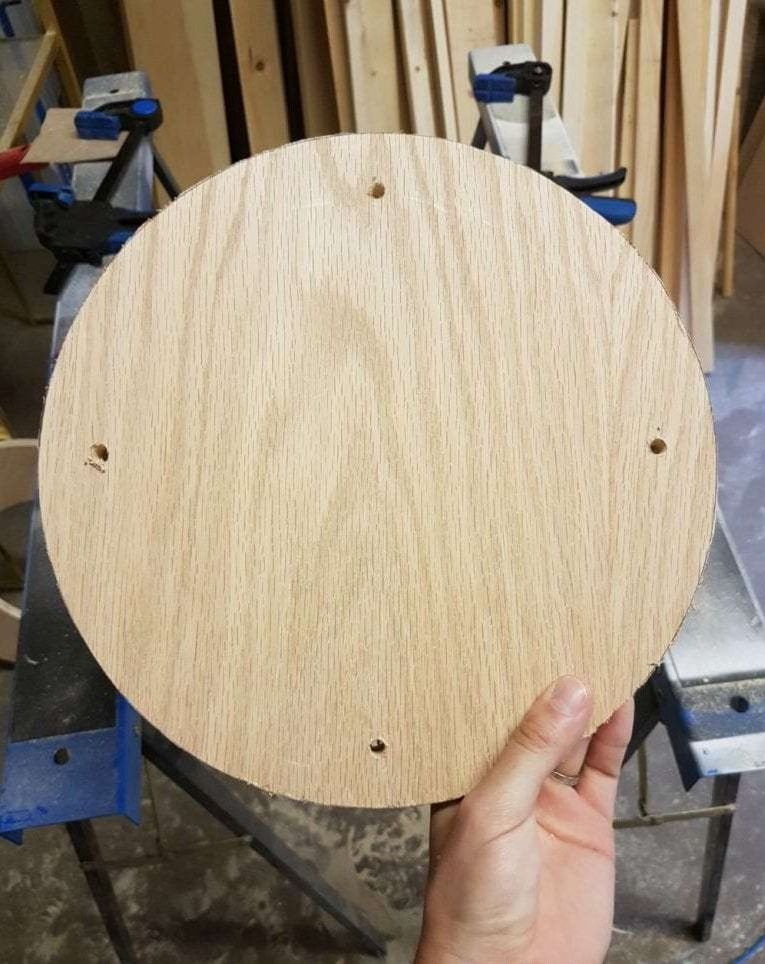
3) After drilling the holes, lightly sand both sides, edges, and around the holes, so everything looks nice and smooth.
4) At this point, if you wish, you can stain or paint the circle.
5) You can use white nylon clothesline rope, which is really cheap and super strong.
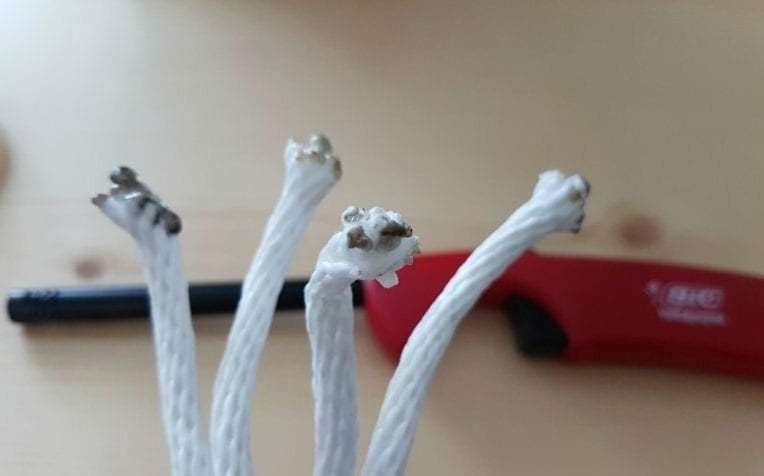
6) Decide how low you want your pot to hang and add 20cm. Remember, you can always cut off the excess later if your rope is too long. In this case, two pieces of rope, each 2.5 meters long, were cut.
7) So that the ends of the rope do not fray, melt the edges with a lighter, very carefully.
8) Pass the rope through the holes. You may need to use a screwdriver or other sharp object to help you.
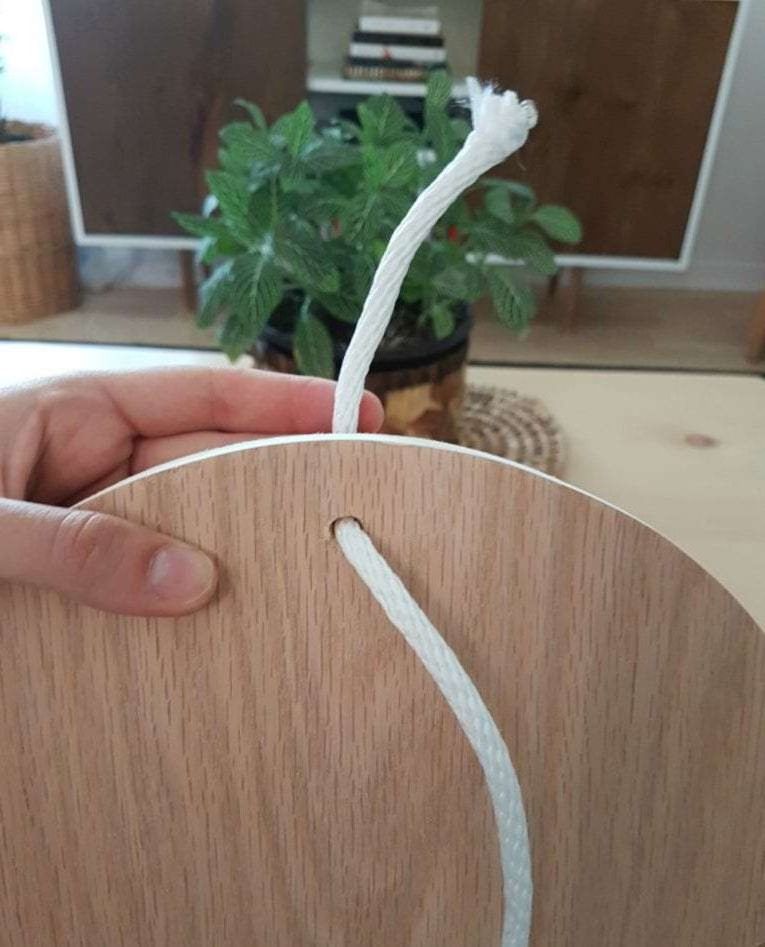
9) Each end of a strand of rope should be inserted into the opposite holes.
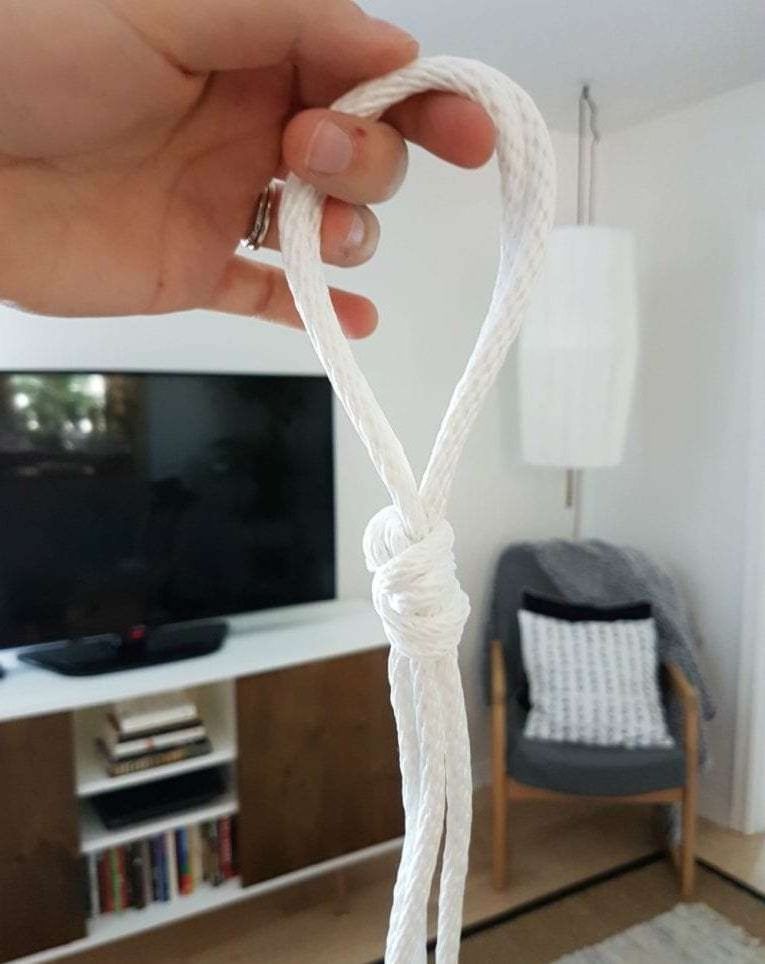
10) Once you’ve threaded all four ends of the rope through the holes, loop the four folds of rope at the top and tie in a tight knot as shown.
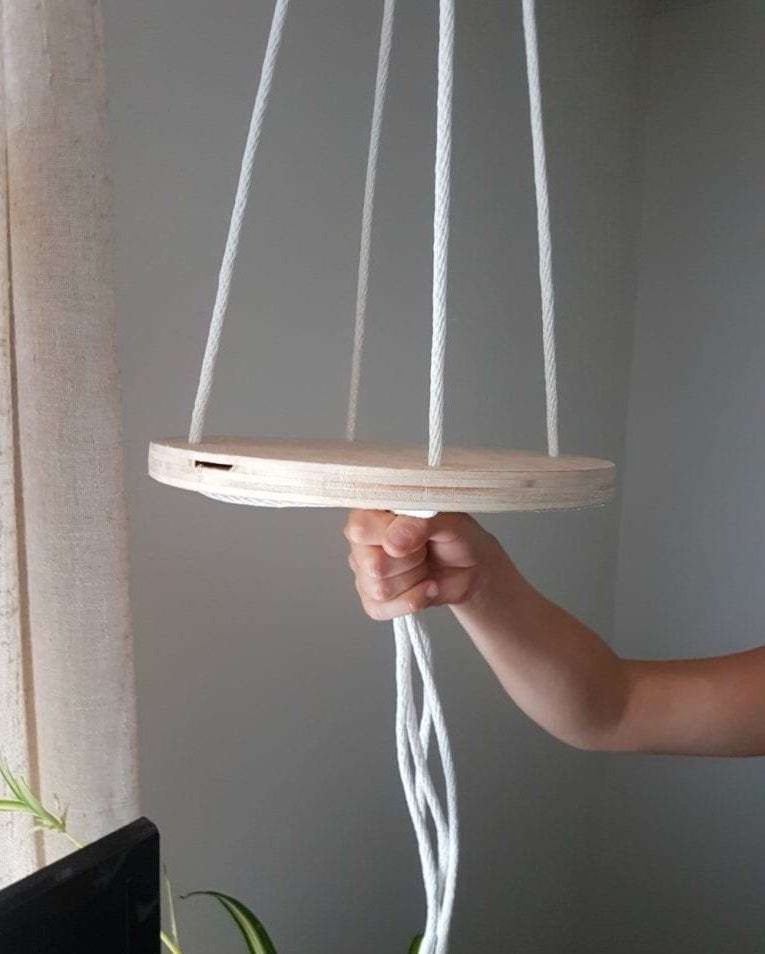
11) Once you have the pot set to the height you like, adjust the wood so it is level and each string should be taut, supporting the bottom with your fist.
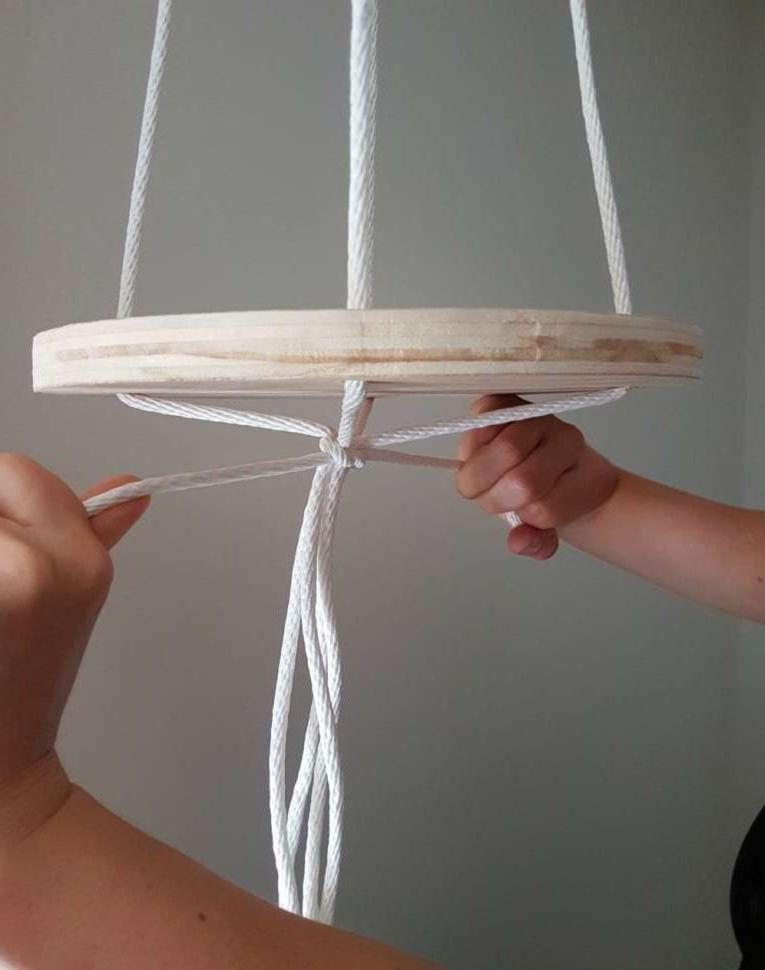
12) When you have the location you want, take a 10-inch piece of string and tie several tight knots around the four strings.
13) You can cut the strings to the desired length and leave them loose, or braid them as seen below. It would be nice to also add some wooden beads or feathers.
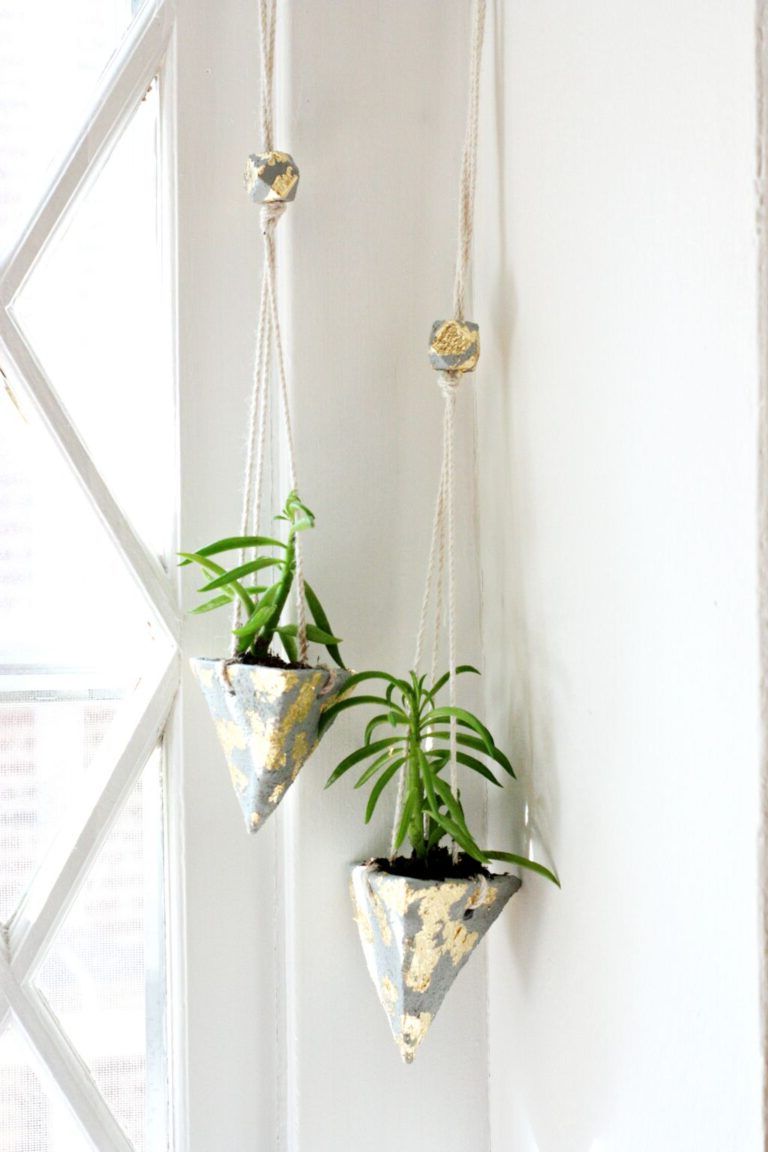
Ceramic or clay hanging planters
These hanging pots can be made of any putty material, whether or not it requires an oven. The result is full of unique texture and style.
 Items needed:
 - Baking clay (or not)
- Rope
- Golden decoupage sheets
- Gilding Adhesive
- wooden beads
- Brushes to apply the finishes and gold
1) Roll out the clay with a rolling pin until it is about 1 cm thick.
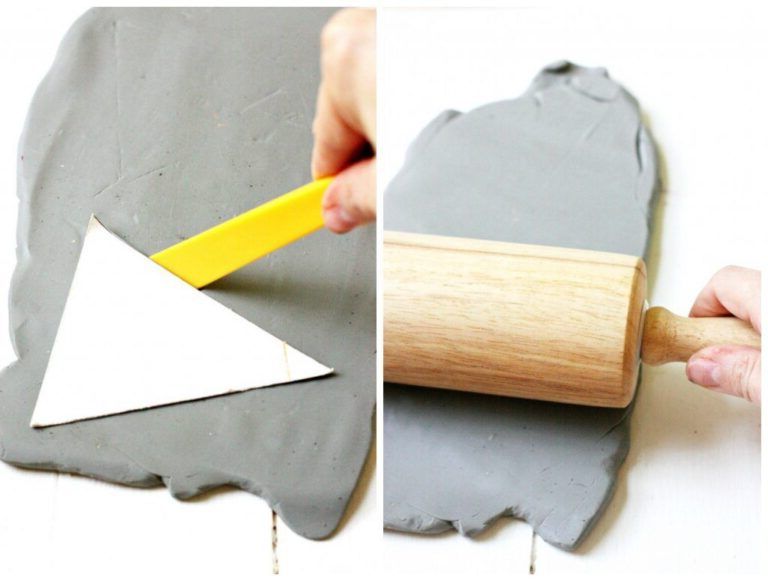
2) Cut out 3 triangles of the same size. A piece of cardboard can be used as a guide so that all the pieces are the same.
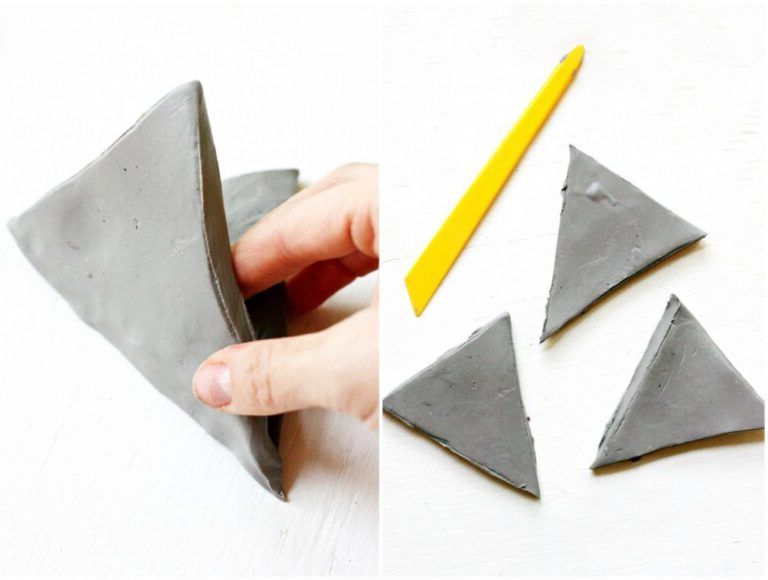
3) Very carefully join and shape the sides, smoothing the clay until all seams are gone (this is especially important as you want the pots to be waterproof).
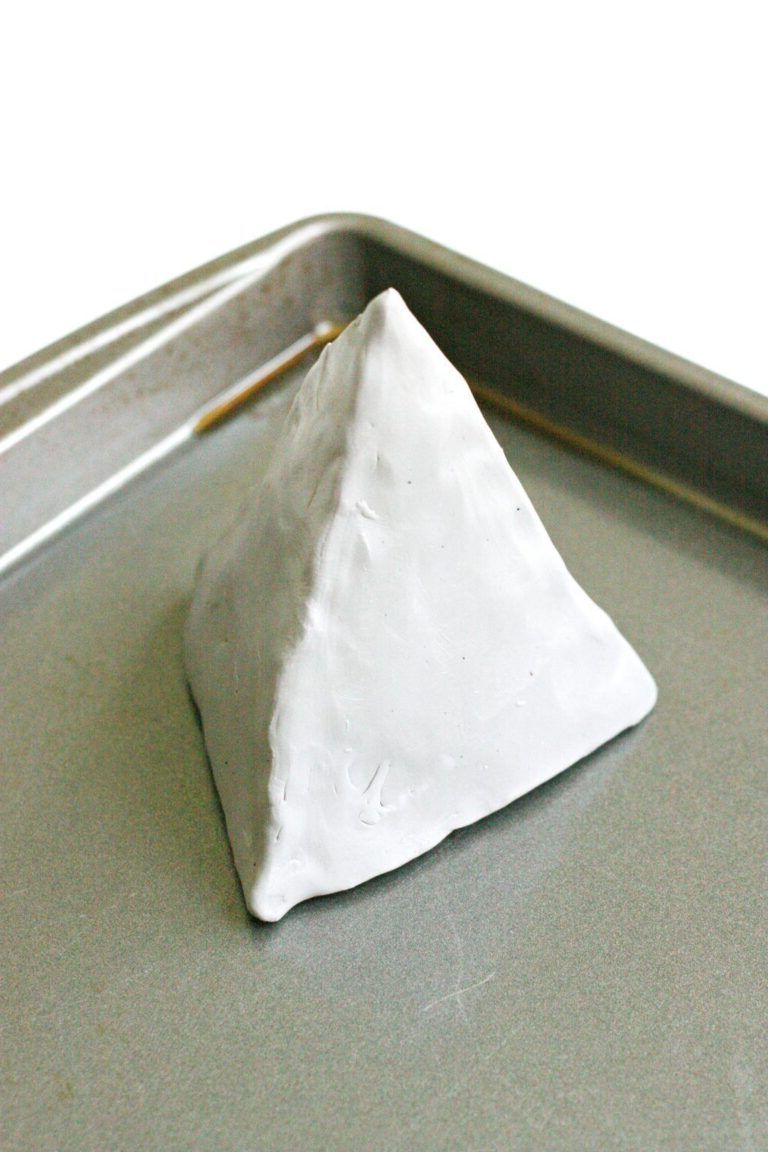
In this particular case, they forgot to cut a hole in each triangle for the rope. It was not a problem as this clay is relatively soft even after baking, so holes could be easily drilled. However, if you want to make it easier, you should make a hole in each triangle BEFORE baking. A straw can be used to do this.
4) Bake the pot according to package directions, checking it regularly at first to make sure it holds its shape.
5) Once your pot has cooled completely, apply the finish you like best. In this case it will be decorated with golden foil
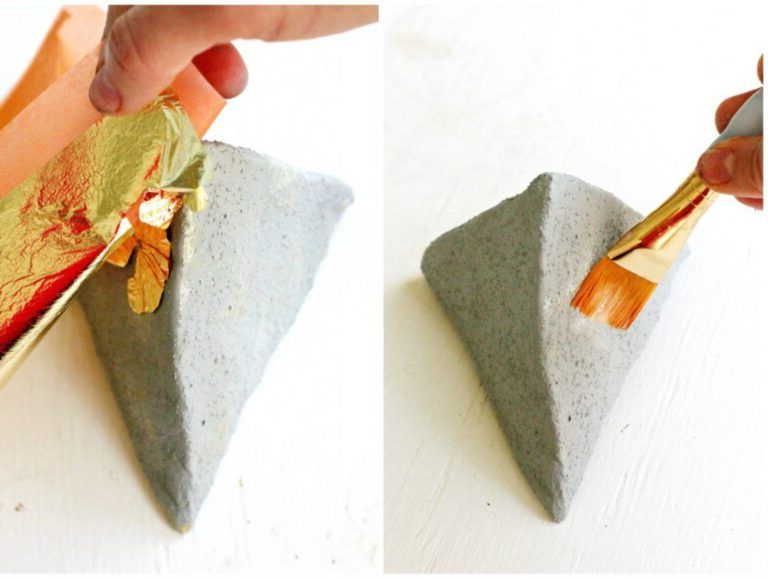
6) Apply glue with a brush and let it dry until it changes from white to transparent. Once the glue is transparent, place the gold leaves on the surface.
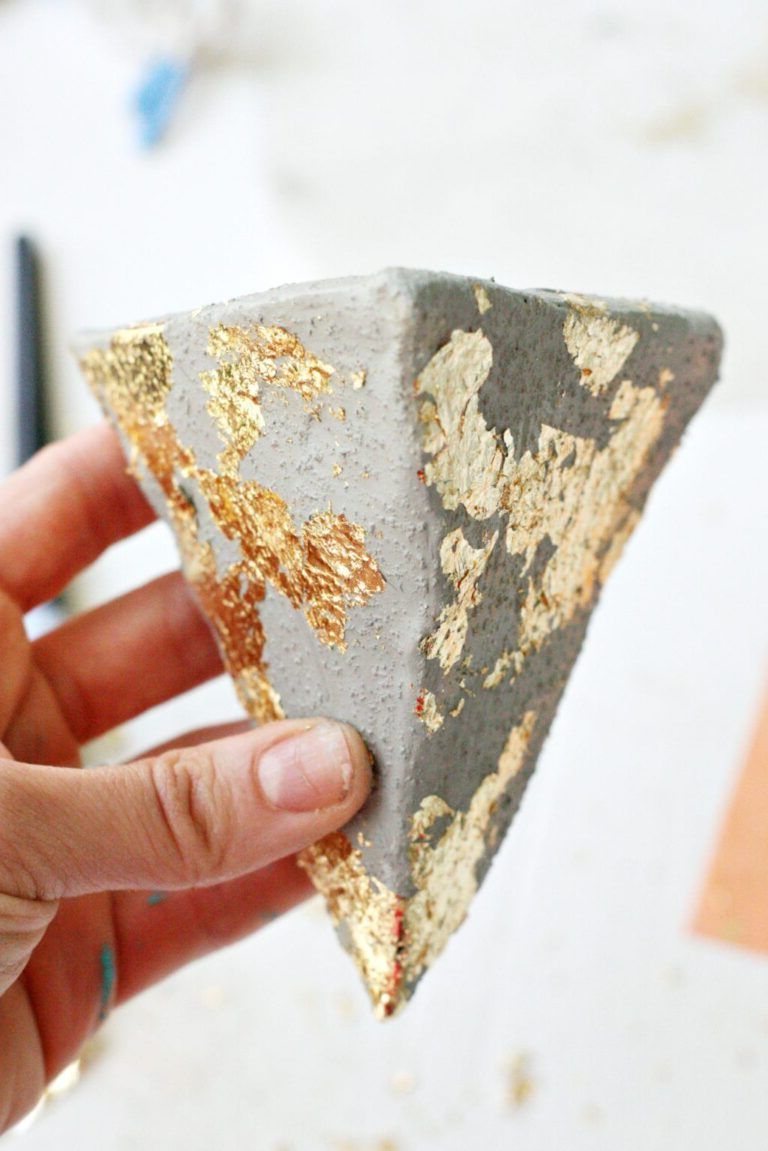
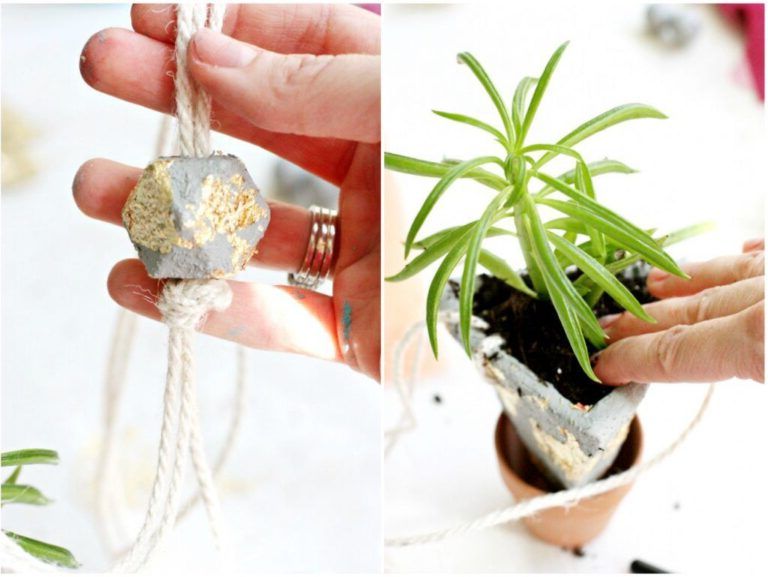
7) Once you’ve applied your preferred gilding or finish, it’s time to plant and attach the strings. Using the holes you created before baking, thread a piece of string through each hole and tie. Then lift the pot by the rope. Check that it hangs straight before tying a knot about 30 centimeters above the pot. You can also make a bead and use it as a decoration on top.

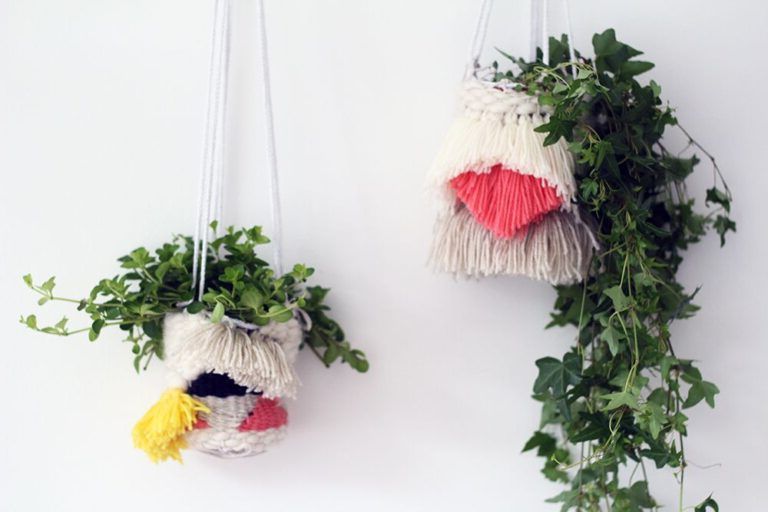
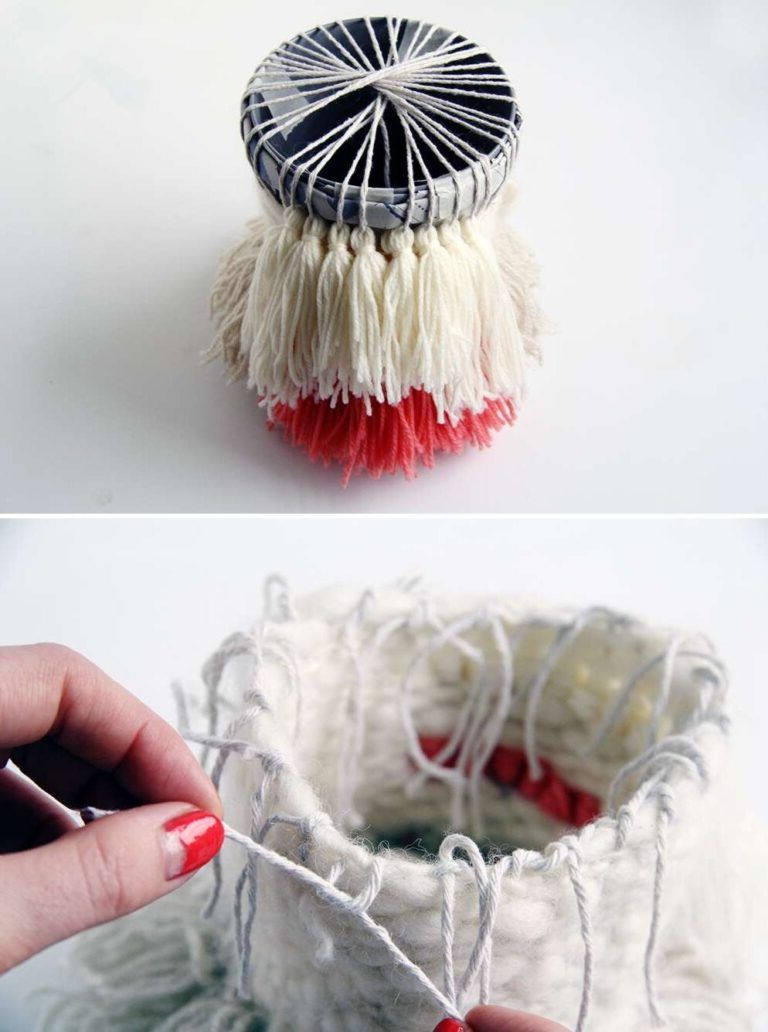
Woven Hanging Planters
Take a hanging planter, mix it with a woven wall hanging, and you have a very pretty indoor garden.
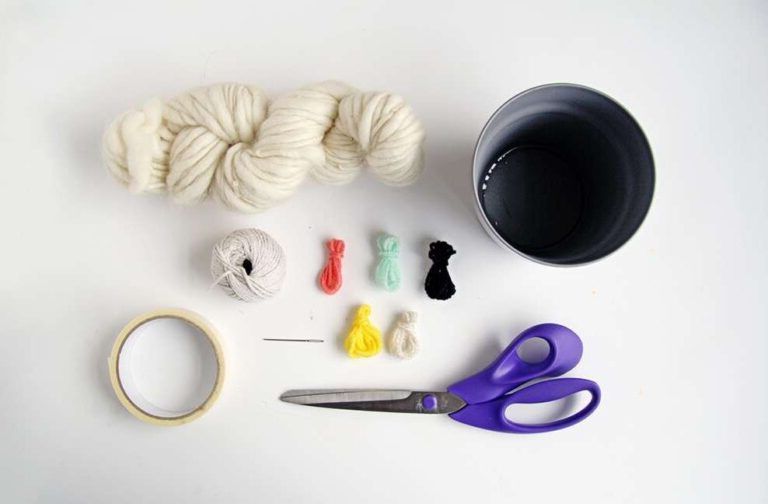
 Materials:
 - wool and yarn
- Flowerpot
- Masking tape
- darning needle / tapestry
- waste paper
1) Fold the waste paper into thin, bulky strips.
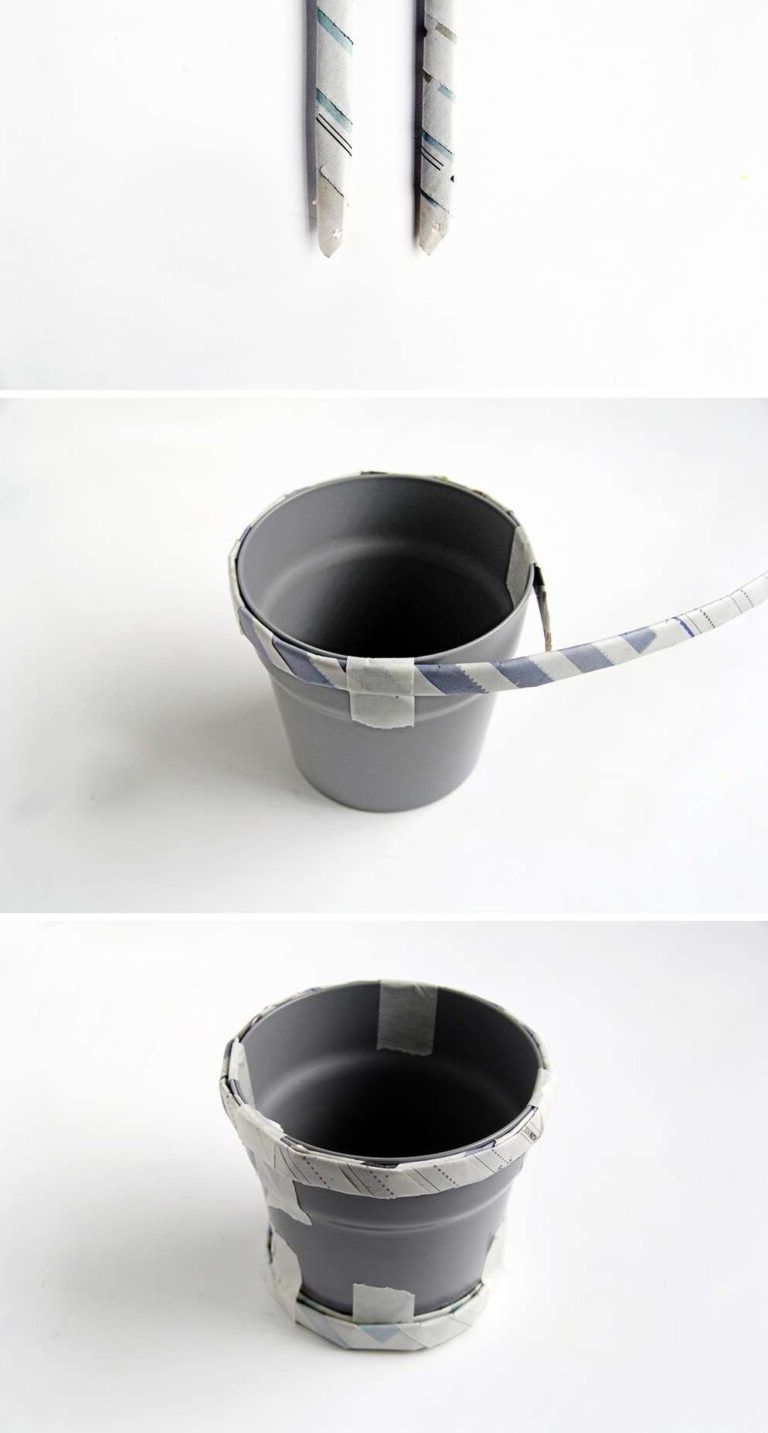
2) Wrap them around the top and bottom of the pot and use masking tape to secure in place.
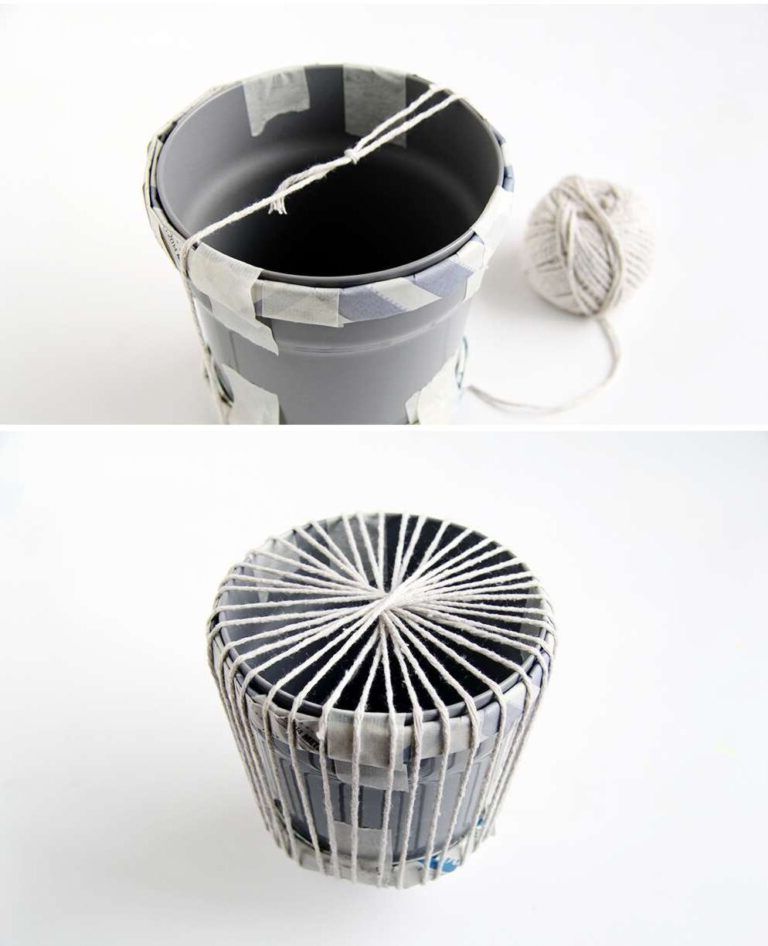
3) Wrap the cord around the pot moving about 1 cm in the same direction, in a kind of spiral. This will make your loom.
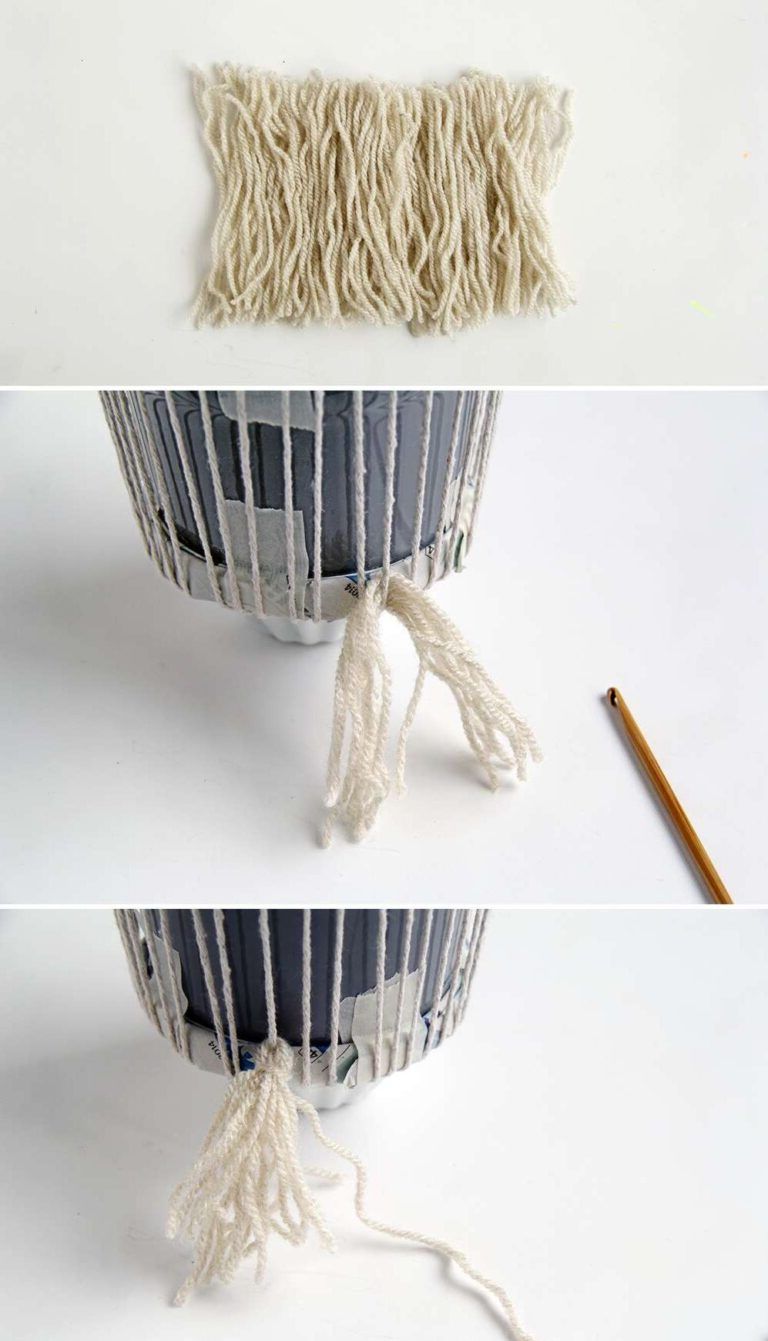
4) To make tassels quickly, wrap the yarn around your hand many times to make many loops. Carefully remove all of them from your hand keeping the loops in place and cut them along one side to get strands of equal length.
5) Thread some of these threads onto one of the loom cords and secure them in place with another piece of thread.
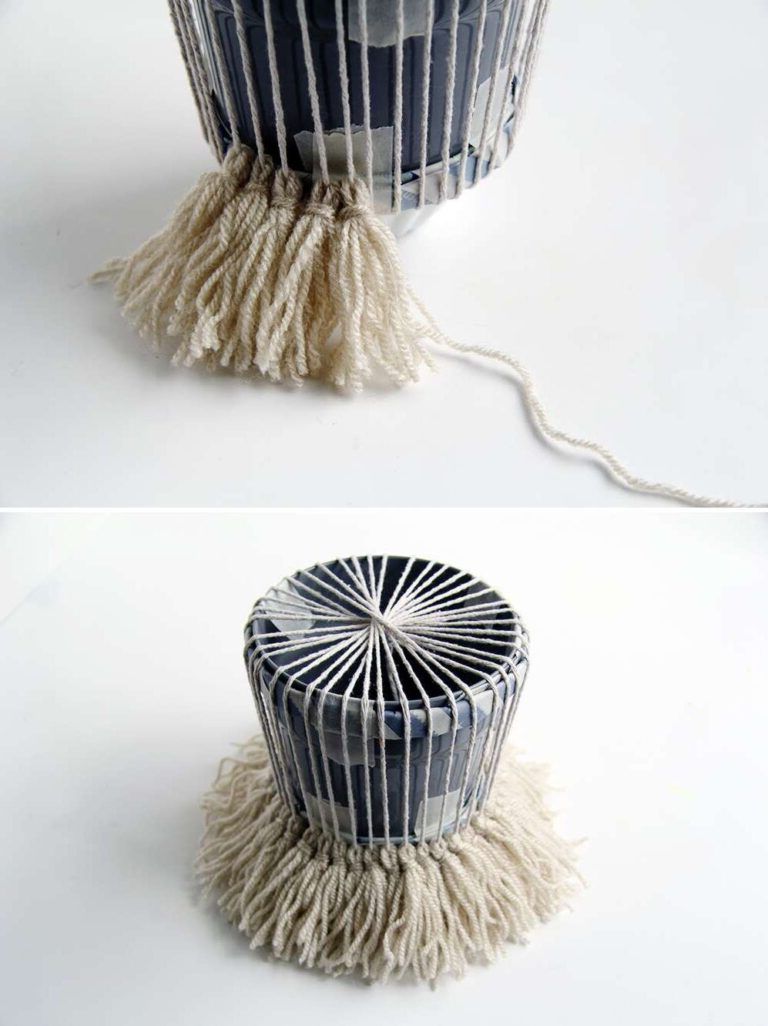
6) Build tassels around the entire pot.
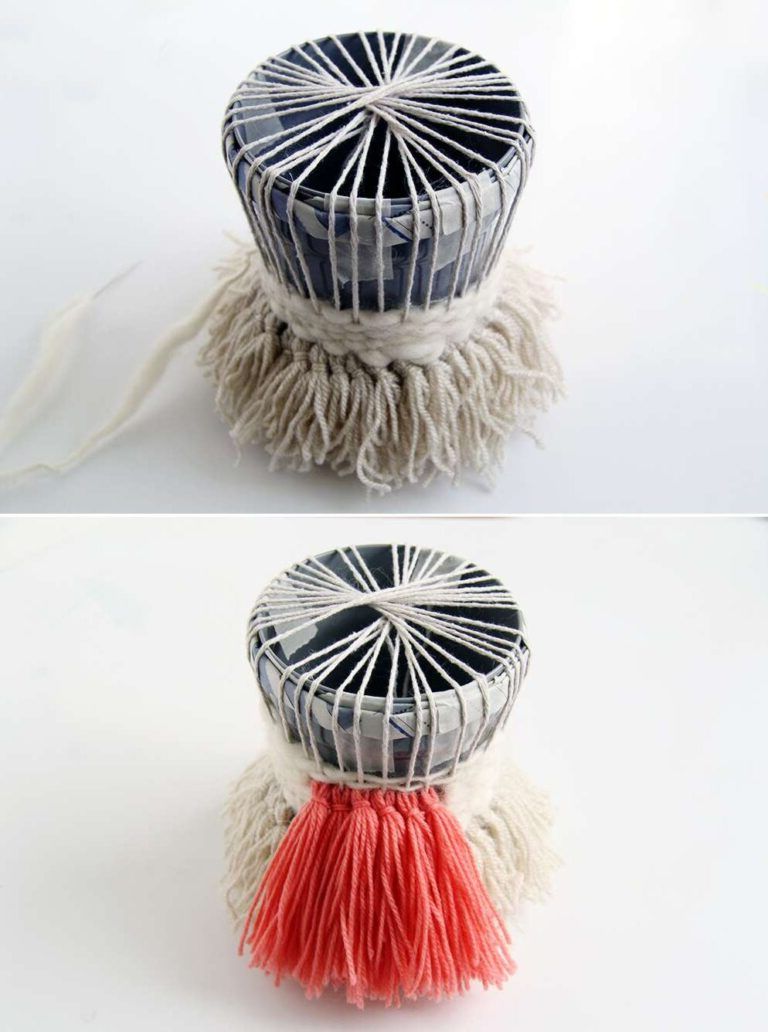
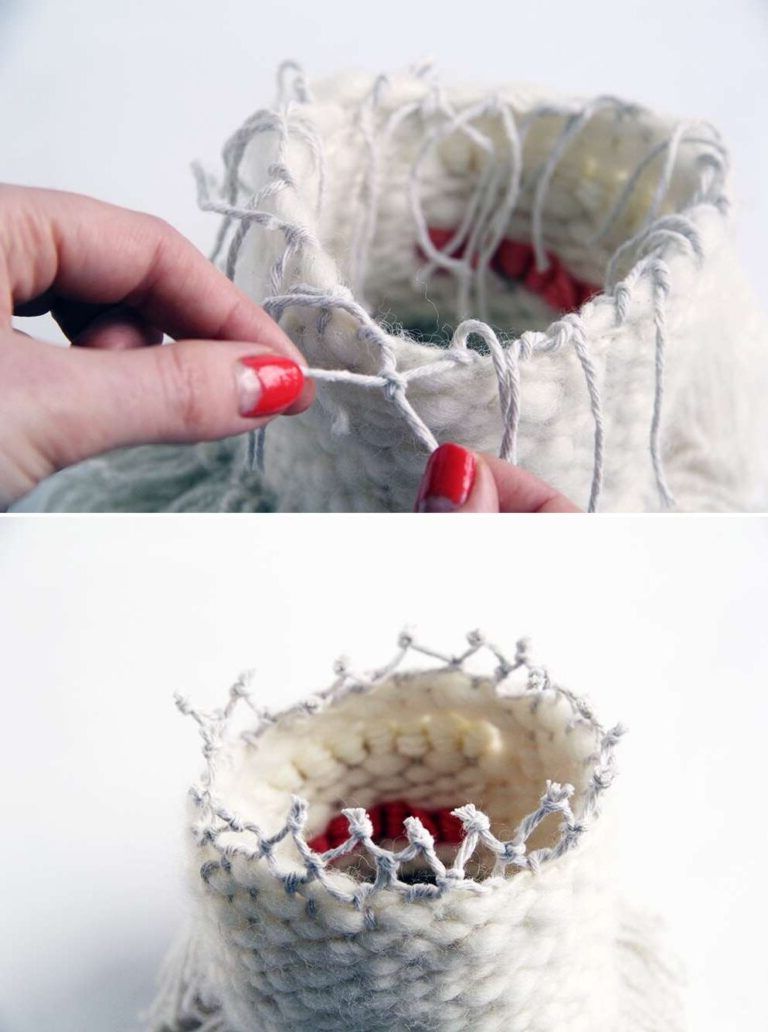
7) Between the tassels, weave a thread of the same or contrasting color into the cords of the loom. It is helpful to use a needle with a large eye when using thicker threads.
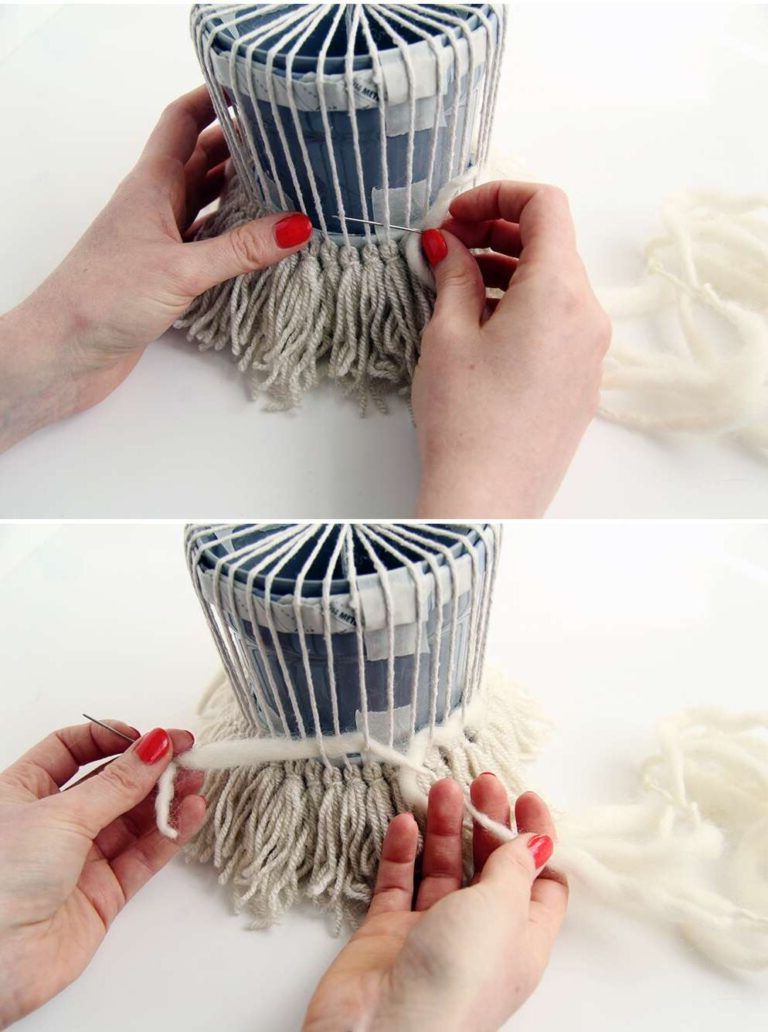
8) Play with patterns, shapes and colors to create modern tribal motifs.
9) When you’re done weaving, cut the cords in the middle of the pot where they meet. Then tie the laces two at a time.
10) Using these cords, make macrame-style knots around the fabric. Make sure these knots are really secure, as you will be hanging the pots from them.
11) Cut three pieces of hanging string (thicker) about twice the length you want the planter to hang. Tie them every three knots of the pot we knitted.
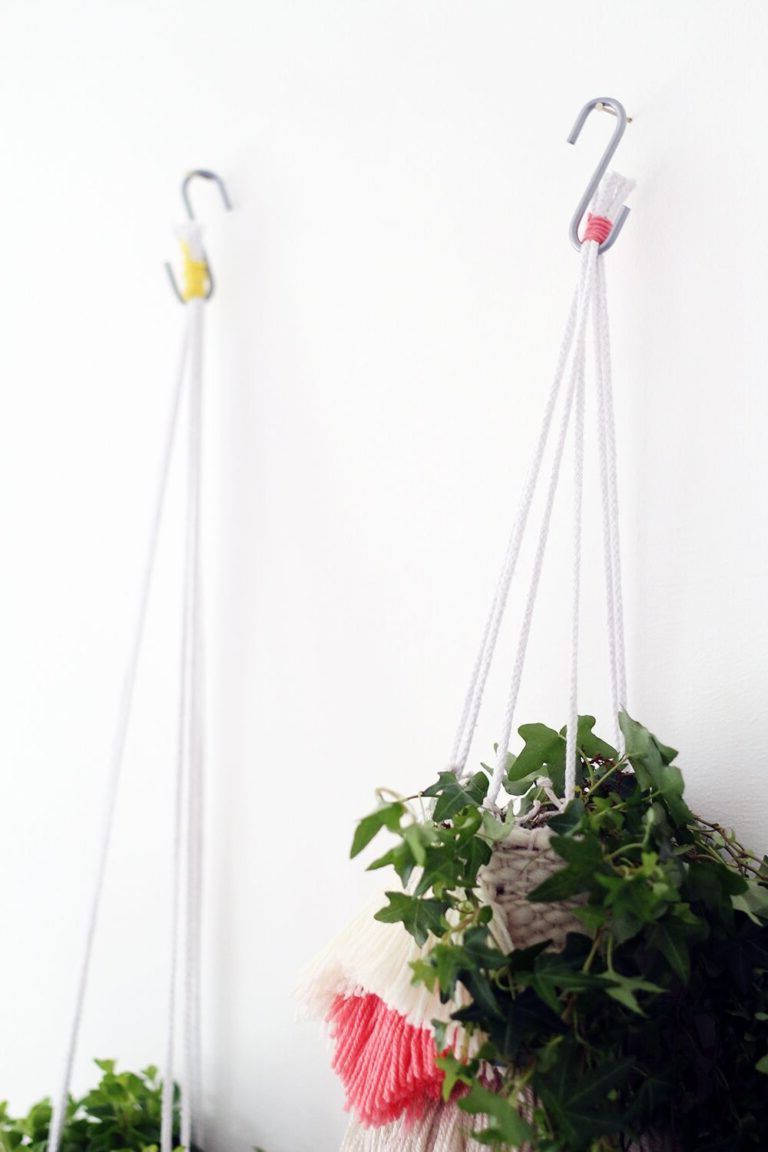
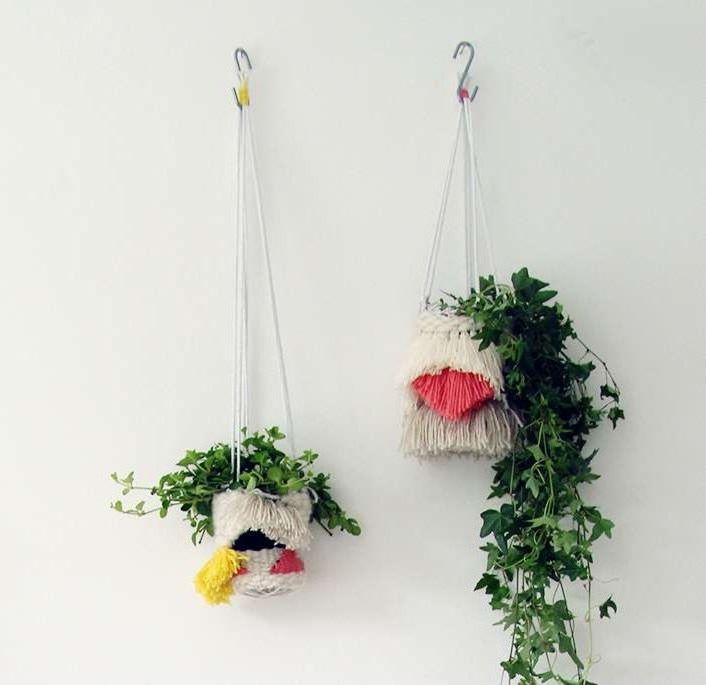
12) Tie and wrap a piece of string around the top of these laces to keep them secure for hanging.